Even though we haven’t had a day that wasn’t in the mid to high 90’s in months, I’m going to go ahead and post another Christmas card! This joyful stocking card was created using the Spellbinders July Large die of the Month. I had a blast making this card because I used a couple of new to me techniques, including making my own glossy cardstock (thanks again to Jennifer McGuire!) and using perfect pearls to make what seems to be the perfect gold metallic paint for background splatter. Plus, I’m really loving embossing folders lately and this was the perfect opportunity to use one of my favorites from Spellbinders. All the details are listed below.

STEPS
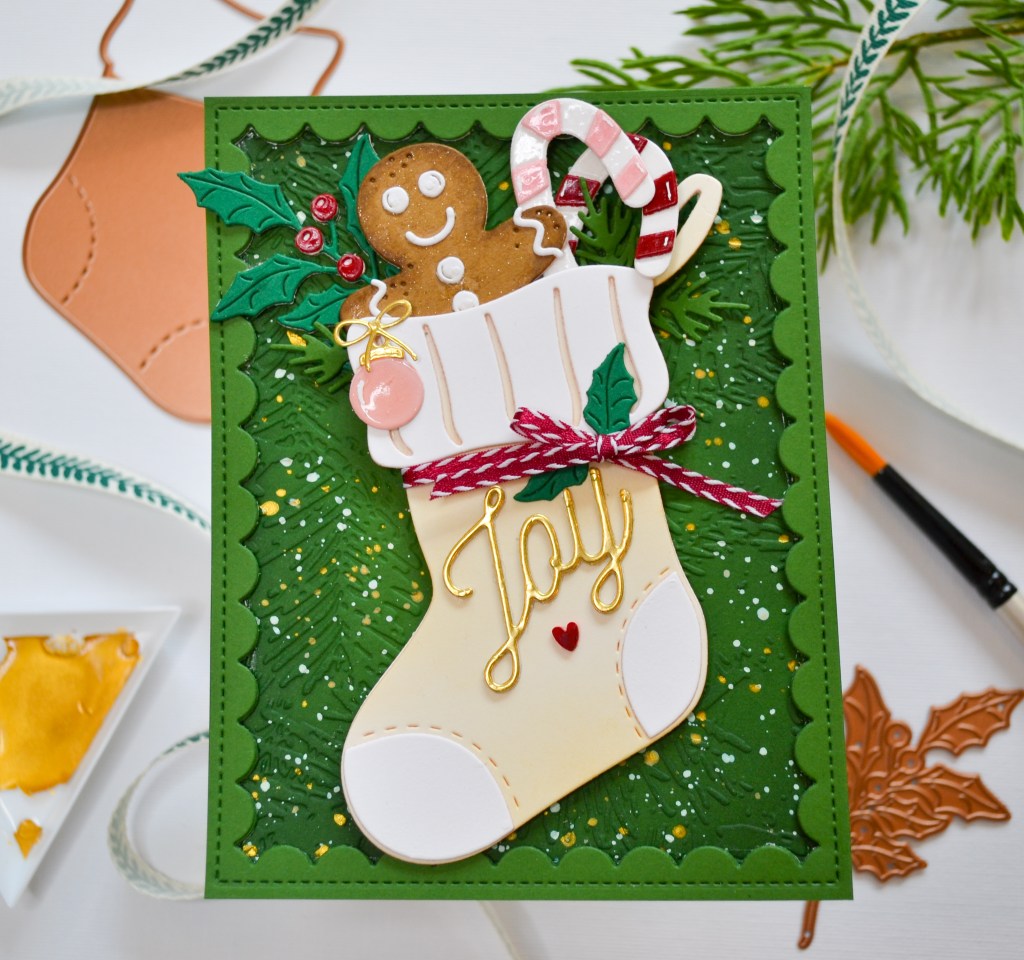
1.) The first step was to create this amazing background. I used an A2 sized piece of my very favorite color of green cardstock EVER, Gumdrop from Bazzill, and a 3D embossing folder from Spellbinders, running it through my die cut machine following the recommended sandwich set-up for my particular machine. The results are this beautiful raised design of pine needles. I then softly applied a darker green ink to the design, catching the raised areas to highlight them, and then applied the same ink to the edges a few times and with more pressure to create a subtle ombre effect. For the splattered background, I mixed Perfect Pearls Powder in Gold with the tiniest bit of water, creating the perfect consistency for splattering. I was so happy with how this looked, and wish I would have tried it sooner. It creates, in my opinion, the perfect(ha!) opaque, metallic paint. I also used white gouache paint thinned with just a little water. My process for splattering is to put whatever I’m splattering in a deep plastic bin, and then use a paint brush dipped in paint or ink, and just tap the brush against my finger. The bin really helps in containing the overspray of paint that used to get all over my workspace. Lastly, I die cut two of the reverse scalloped frames in the Gumdrop green cardstock and glued them in place.
2.) Next, I die cut all the stocking elements and glued them together. I did add just a little Antique Linen Distress Ink to the edges of the ivory stocking, but it’s hard to tell in the photos. I knew I wanted to add the burgundy ribbon detail, so I tied it around the stocking and then glued another stocking die cut behind it. I die cut the word Joy in a matte gold cardstock three times, and glued them together before attaching to the stocking. Then I attached the whole piece to the background with foam tape to give it dimension, leaving room at the top so I could tuck all the stocking stuffers inside. Just like a real Christmas stocking!
3.) For the stocking stuffers, I decided to use two candy canes, one red and one pink, the gingerbread man and some greenery. There is also a gnome in the set, but I decided not to use it for this project. I wanted the candy canes and the berries to be glossy but Glossy Accents can be yellowing and I don’t get great results with Hero Arts Crystal Lacquer when covering larger areas. So, I decided to try making my own glossy cardstock with embossing ink and clear embossing powder. I swiped the embossing ink directly on some white, pink, and red cardstock then heat set clear embossing powder with my heat gun, doing the whole process twice to achieve a really smooth, glossy area. The results aren’t quite as glossy as some of the other options out there, but I was pretty happy with how it turned out. I was worried that die cutting the pieces would damage the glossy finish, but it die cut nicely, even the smaller pieces. I assembled the candy canes and added the berries to the greenery. The Gingerbread man is die cut from brown and white cardstock. I used Copic markers to do just a little shading around the edges so he looked more dimensional. After everything was assembled I tucked all the elements into the stocking, fiddling with it all until I was happy with their placement, using glue and foam squares to attach them. For the little pink ornament, I ended up using Glossy Accents because I wanted that raised, glossy bubble you get when it dries, and finished with matte gold cardstock for the ornament cap and bow.
4.) Adding a few embellishments before gluing the panel to a top-fold card base finished this project. I tucked in a few small greenery pieces, added a red heart that I darkened with a Copic marker, and used a white gel pen for some highlights.
SUPPLIES AND TOOLS
Neenah 110# Classic Crest Cardstock Solar White
Lawn Fawn Vanilla Malt Cardstock
Bazzill Gumdrop Heavyweight Cardstock
Simon Says Stamp Matte Gold Cardstock
Cardstock from my scrap bin in brown, pink and green
Simon Says Stamp White A2 Top Fold 120# Card Base
We R Makers Quickstik Precision Pickup and Placement Tool
Sizzix Curved Fine-Tip Tweezers
Spellbinders Platinum Die Cutting And Embossing Machine
Bearly Art Precision Craft Glue
Scrapbook Adhesives .25″ 3D White Foam Squares
Simon Says Stamp Pawsitively Perfect White Foam Tape
Versamark Watermark Embossing Ink Pad
Ranger Clear Embossing Powder
Ranger Glossy Accents
Ranger Perfect Pearls Gold Powder
Winsor Newton Permanent White Gouache Paint
Spellbinders Large Die of the Month
Spellbinders In The Pines Embossing Folder
Lawn Fawn Reverse Stitched Scalloped Rectangle Window
