Today I’m sharing my entry into the Pinkfresh Studio’s Monthly Challenge for August – Sparkle and Shine! My card design sparkles with elements of hot foiling, metallic gold ink, and gold embossing. Plus, I was able to incorporate three of the five chosen colors from their inspiration palette. I chose to use products from the beautiful Folk Garden release because I was so eager to try out the hot foil plate. I’m still new to hot foiling, and I have to say it’s addictive! There is definitely a bit of a learning curve for this technique, but I think it’s worth it because the results are so impressive. Especially when paired with coordinating products, like stencils and dies. I’m excited to be sharing this card with you today, showcasing the shiny, sparkly beauty of hot foiling! Listed below are all the details.

STEPS
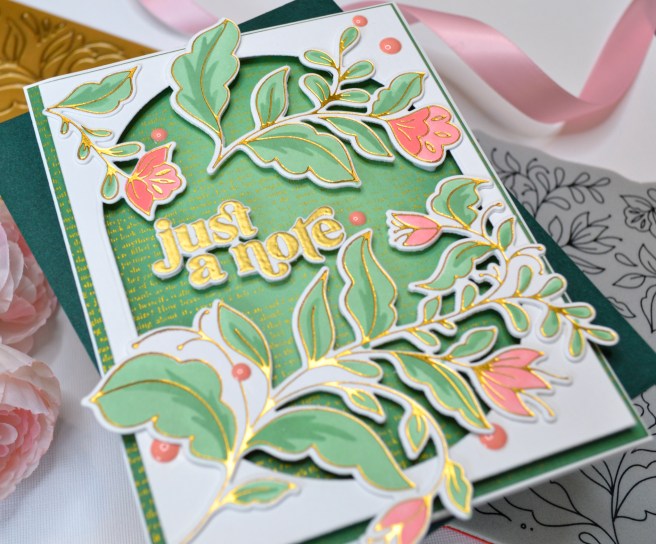
1.) I started this project with the hot foiling first since I was eager to try out something other than sentiments. I used gold foil, and Hammermill 100# smooth white cardstock, which is recommended by many card makers for achieving the best results. I followed the instructions and the sandwich recommendations provided with my Glimmer machine and I didn’t have any problems. One tip is that I would recommend “undocking” the hot foiling platform before you lay your foil and cardstock on top of your heated hot foil plate. That way it has already been released from the machine and you wont risk things shifting or moving around too much while you remove the platform and transfer the whole thing to your die cut machine. Having your machines right next to each other helps too. Some card makers have suggested adding an extra, thin shim for added pressure while running everything through your die cut machine, but I didn’t find that I needed this.
2.) After hot foiling the folk garden design, I used the coordinating stencils to apply ink in muted greens and pinks. It’s truly amazing when you lift the last stencil to see the results. The hot foiling and stenciling give you such a beautiful product that it’s hard to believe it was homemade. I then die cut the design, and set it aside while I made the background.
3.) For the background, I started with an A2 sized piece of white cardstock that I ink blended with the same muted greens as the leaves. Using three shades of green, I started in the middle with the lightest green, and gradually added the darker greens as I moved towards the edges of the cardstock. Then I stamped a text background from Hero Arts in metallic gold across the entire inked panel. The metallic pigment ink needs quite a bit of dry time, so I set this aside for a few hours before slightly trimming the panel down – maybe an 1/8″.
The white cardstock is die cut with a Nesting Dome Die from Waffle Flower. I used just the rounded dome portion of the die at the top and the bottom to get an oval shape. To do this, I just stopped running it through my die cut machine a little before the straight bottom portion of the dome die was to go through. Then I turned the die around, placing the dome portion on the other end and ran it partially through my die cut machine like before. To make the panel slightly smaller than A2, I die cut it with a Hero Arts Nesting Rectangle Infinity Die.
Now that the green and gold background was dry, I used foam tape to attach the white oval piece. I centered it, leaving a border around the entire white panel. I love how it looks having this piece floating above the green and gold background.
4.) Next, using glue and a ton of foam squares, I attached all the beautiful, stenciled, and hot foiled floral elements to the white panel, letting them overhang the edges. I placed everything so that I could fit in a gold, heat embossed sentiment that I double heat embossed to give it a smoother look. I also used foam squares on the sentiment. You can never have too much dimension! To finish the design, I used some enamel dots from The Stamp Market that happen to match the color of the blooms perfectly. Lastly, I glued the panel to an A2 side-fold card base.
PRODUCTS AND TOOLS
Neenah 110# Classic Crest Cardstock Solar White
Hammermill White 100# Smooth Premium Color Copy
Simon Says Stamp White A2 Side Fold Scored Cards 120#
We R Makers Quickstik Precision Pickup and Placement Tool
Sizzix Curved Fine-Tip Tweezers
Scotch 3M Post-It Masking Tape
Simon Says Stamp Blending Brushes Small
Simon Says Stamp Blending Brushes Small Detail
Hero Arts Nesting Rectangle Infinity Dies
Hero Arts Novel Prose Bold Prints
Waffle Flower A2 Nested Domes
The Stamp Market Enameled Dots Collection 3
Spellbinders Platinum Die Cutting And Embossing Machine
Spellbinders Glimmer Hot Foil System
Misti Precision Stamper Tool
Bearly Art Precision Craft Glue
Scrapbook Adhesives Thin 3D White Foam Squares
Spellbinders Glimmer Hot Foil Roll Satin Gold
Hero Arts Gold Embossing Powder
Pinkfresh Folk Garden Hot Foil Plate
Pinkfresh Folk Garden Die
Pinkfresh Folk Garden Layering Stencils
Pinkfresh Perfect Sentiments Stamp Set
Pinkfresh Perfect Sentiments Die
Tsukineko Golden Glitz Delicata Ink Pad
Simon Says Stamp Pawsitively Saturated Inks Colors:
*Aspen
*Sage
*Pine
*Cheeky
*Blush
