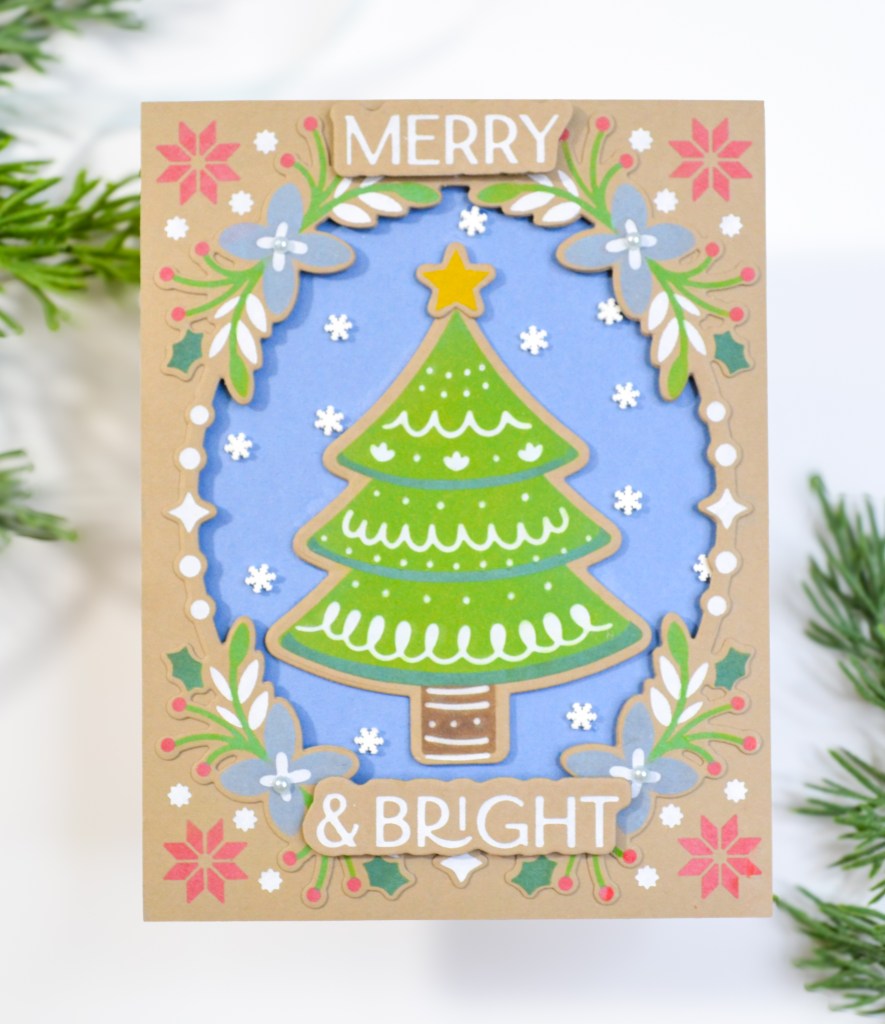
I don’t use Distress Oxides very often but when I do, it’s almost always on kraft. I love the intensity of color you get, even on a darker cardstock. Lifting away the stencil is almost magical with oxides, kinda like watching embossing powder melt or lifting away a mask when stamping. Or, like lifting away the foil when hot foiling. For this project, instead of using the usual metallic foils, I used white foil. It was my first time using white and I love the impact it has against the kraft cardstock. I foiled part of the Folk Art Frame Bundle from Waffle Flower Crafts, the optional foil plate for the frame and for the tree. This bundle is so amazing with its interchangeable layered stencils, hot foil plates and of course, coordinating dies. You can use all stencils or some of the stencils with the hot foil plates or just the foil plates… honestly, there are so many options it was a little overwhelming. But once I spent some time playing with everything and became familiar with all of the components, I was hooked. Plus, Waffle Flower adds etched details of the stencil design to their layered stencils, making it so easy to align everything. This project is actually the first of many using this bundle because I was having so much fun! I’ve listed below all the details, and thanks so much for visiting!

STEPS
1.) First, I started with foiling. I foiled the frame in white on an A2 kraft cardstock panel. I actually did this twice, for two frames, because I wasn’t sure how I was going to use all the different components. Then I foiled the tree and the sentiment on another piece of kraft cardstock.
2.) Next, I stenciled the first two layers of the frame stencils with Oxide Inks for both foiled panels. The hot foiling takes the place of the third stencil. Oxides will sit on top of the foiled areas and instead of wiping with a microfiber cloth, which can smear the ink, I used a cotton swap and a small amount of rubbing alcohol. Then, I stenciled and die cut the tree.
3.) With one of the frame panels, I used just the inner frame die to die cut the middle portion from the panel. With the other frame panel, I used both the inner and outer frame dies to die cut the floral design completely. I used liquid adhesive to attach this floral piece on top of the florals of the first panel, giving it some dimension. Using foam tape, I attached the entire panel to a piece of light blue cardstock. I centered the tree in the opening of the frame with liquid adhesive. I decided to add a star to my tree, so I pulled out a star stamp and die from another set and used those to top my tree.
4.) The sentiment is one long strip but I felt like it covered too much of the design, so I cut it, separating the words to better fit the card. I attached both pieces with foam squares. Then, I added the fun details. White clay snowflakes for the background and white pearls for the flower centers. I attached everything to an A2 side-fold card base to finish my card.
SUPPLIES
Waffle Flower Crafts Folk Art Frame Bundle
Waffle Flower Crafts Elegant Christmas Foil Plate
Waffle Flower Crafts Elegant Christmas Foil Plate Matching Die
Bazzill Card Shoppe 100lb Cardstock Peanut Cluster
Simon Says Stamp White A2 Side Fold Scored Cards 120#
We R Makers Quickstik Precision Pickup and Placement Tool
Sizzix Curved Fine-Tip Tweezers
Spellbinders Glimmer Hot Foil System
Spellbinders Platinum Die Cutting And Embossing Machine
Bearly Art Precision Craft Glue
Scrapbook Adhesives .25″ 3D White Foam Squares
Tim Holtz Tonic Craft Mini Snips
Misti Precision Stamper Tool
Waffle Flower 6.5×8.5 Grip Mat
Simon Says Stamp Blending Brushes Small
Lawn Fawn Bone Folder
Scotch 3M Post-It Masking Tape
Simon Says Stamp Pawsitively Perfect White Foam Tape
Glimmer Hot Foil White
Honey Bee Stamps Holiday Pearls
Trinity Stamps Vanilla Sugar Snowflakes
Distress Oxides
* Barn Door
* Tumbled Glass
* Mowed Lawn
* Ground Espresso
* Rustic Wilderness
