
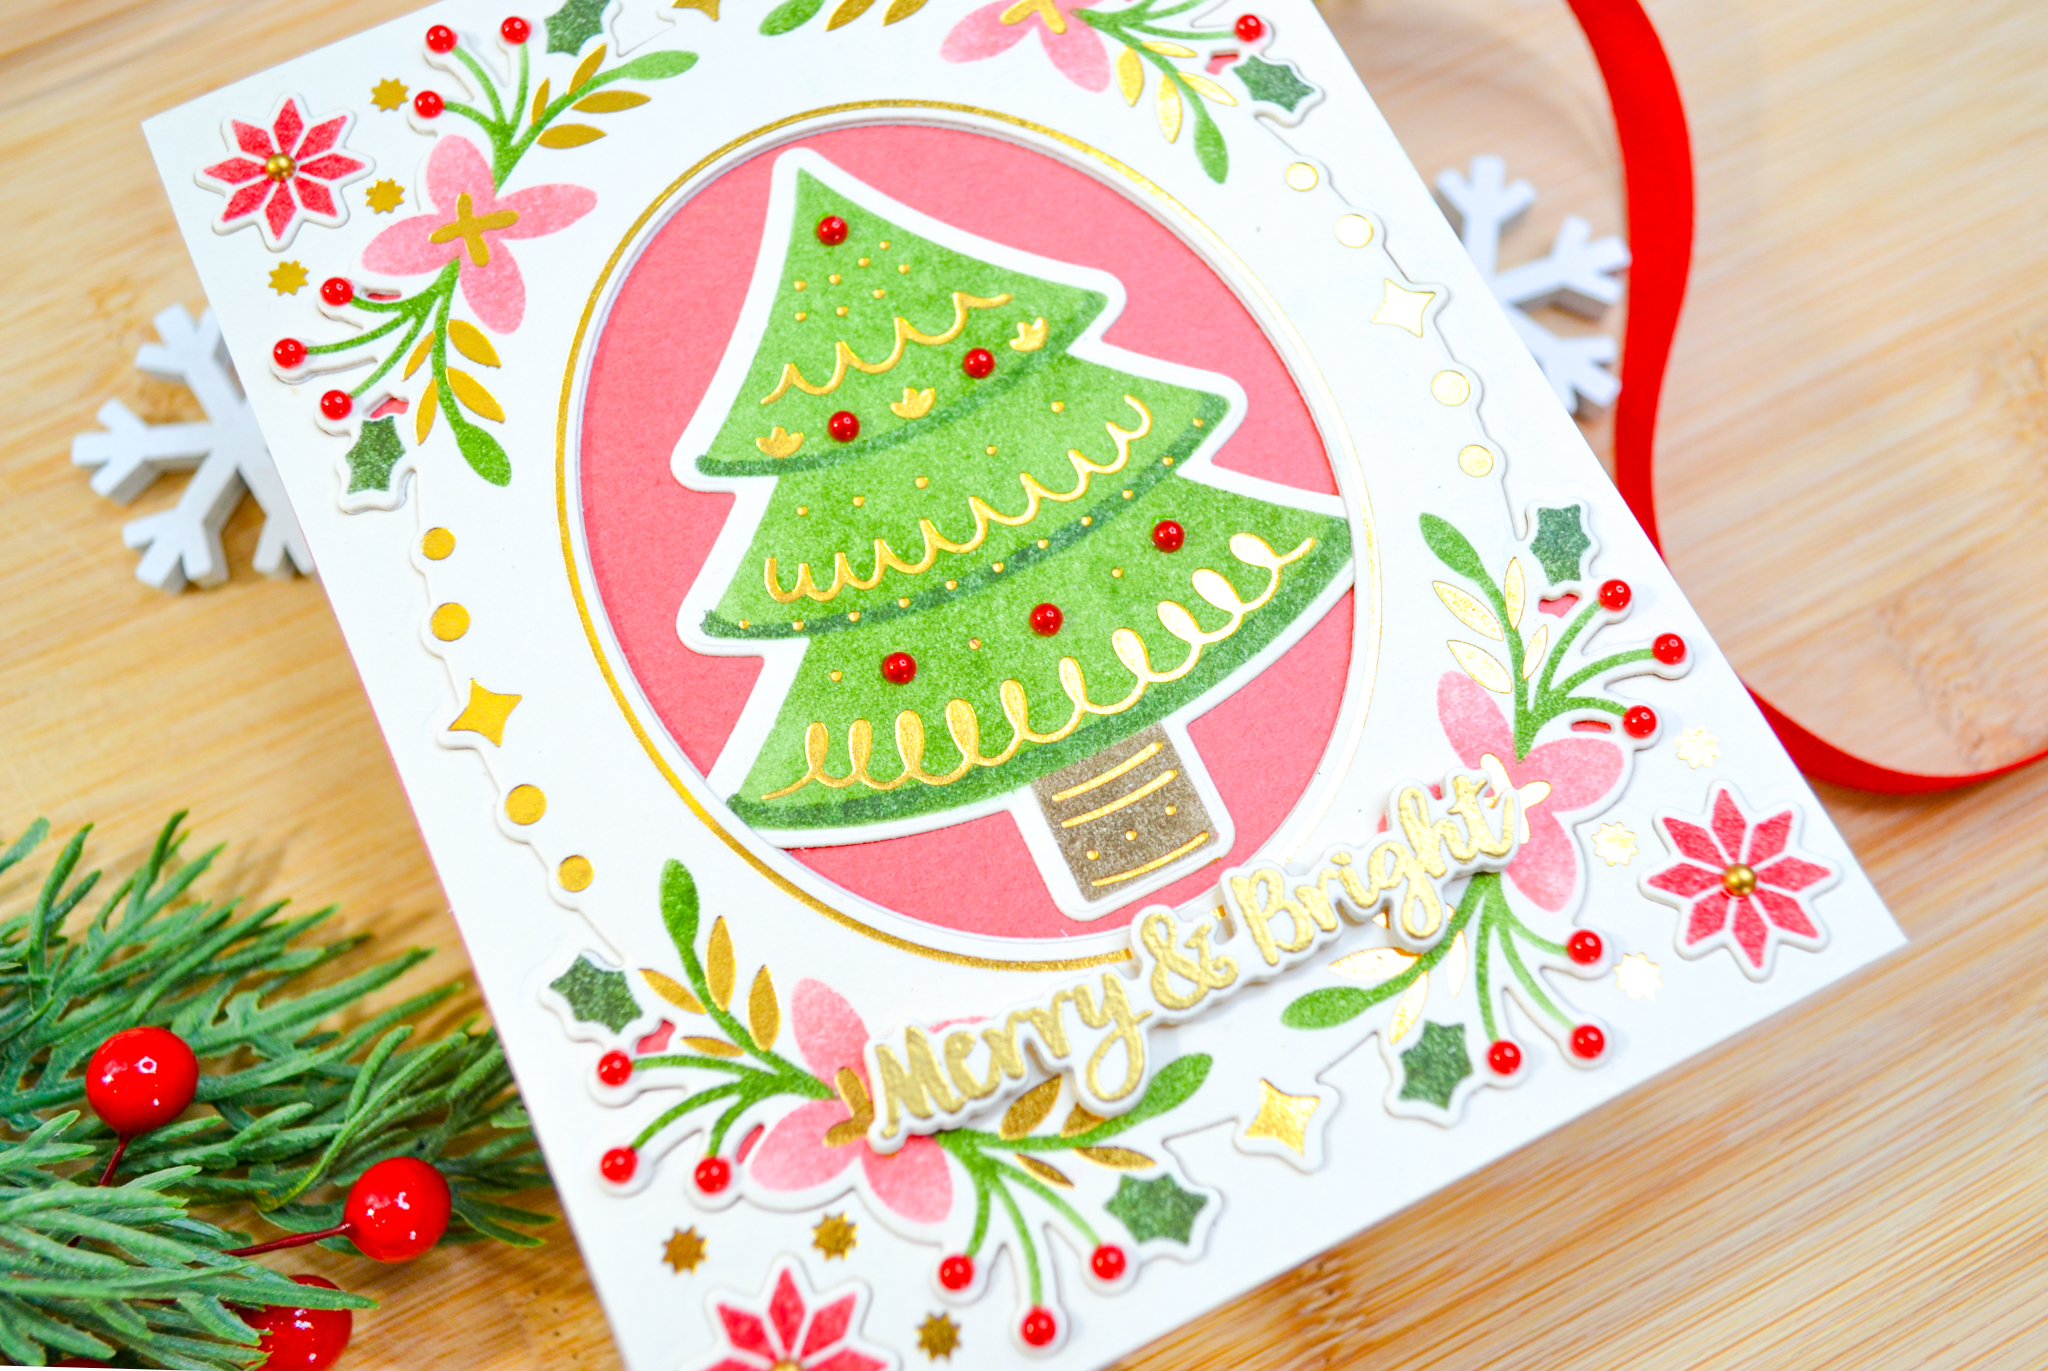
Today, I’m sharing two more cards using the Folk Art Frame Bundle from Waffle Flower Crafts, and I think they are my favorites of all the cards I’ve made using the bundle. One card is stenciled on ivory cardstock, in pinks and reds with gold accents. The other is stenciled on white cardstock, in blues and greens with silver accents. When I can, I like to make two cards of the same design but change up the colors, the background, or even just the embellishments to show what a difference it can make. I love how both cards turned out, but I think my favorite is the warmer, red and pink card. The ivory cardstock gets me every time! I paired this Folk Art Tree duo with sentiments from Hero Arts and added pretty pearls and gems as embellishments.
I have two other posts that feature the Folk Art Bundle, here and here, that include a lot of the same elements and techniques. Below you’ll find the steps for completing these cards and the supplies I used. Thanks for visiting!
STEPS
1.) Hot foil the frame two times, one in gold on an A2, ivory card panel and the other in silver on an A2, white card panel. Then, with the first two layering stencils and your choice of ink colors, stencil the rest of the frames. I chose two different greens for each card design and a lighter and darker tone of the same color for the florals and berries of each card as well.
2.) Die cut the foiled frame from both panels using just the outer frame die and then die cut the centers using the small oval from the Bird Die. I die cut the outer frame and the center oval again, from plain cardstock, so I could stack them for a little dimension when it came time to assemble. The outer frame also die cuts the starbursts (or flowers?) in the four corners as well, so I saved those to stack with the stenciled ones too.
3.) Hot foil the tree two times, like the frames, one in gold on ivory cardstock and one in silver on white cardstock. Then, stencil your tree in your chosen colors, I used two greens and brown for each of the trees. Die cut your trees with the coordinating die.
4.) Assemble your completed elements using liquid glue. Stack and glue the frames and inlay them into the original foiled, card panels. Stack and glue the corner starbursts into place. Choose coordinating colored cardstock panels to glue your frames to, as this will show through the oval die cut from the centers. Before attaching the frames to the colored cardstock panels, align the trees in the center of the oval and adhere with glue. You can see that the trees are tucked behind the frames near the bottom. Now, attach the stacked frames to the colored cardstock panels with more glue.
5.) Heat emboss two sentiments, one in gold on ivory cardstock and one in silver on white cardstock. Die cut the sentiments with coordinating dies and, with thin foam squares, attach the sentiments to the coordinating card, just under the trees.
6.) With liquid adhesive, attach red pearls to the tree and berries on the red and pink card and matte gold baubles to the starburst centers. For the blue card, attach teal pearls to the tree and flower centers and clear gems to the starburst centers.
7.) Lastly, attach the completed card panels to A2 side-fold card bases.

SUPPLIES
Waffle Flower Folk Art Frame Bundle
Hero Arts Holiday Season Messages Bundle
Gold Satin Baubles Embellishment Mix
Honey Bee Stamps Holiday Pearls
Memory Box Pastel Fairy Jewels
Lawn Fawn Vanilla Malt Cardstock
Neenah 110# Classic Crest Cardstock Solar White
Simon Says Stamp White A2 Side Fold Scored Cards 120#
We R Makers Quickstik Precision Pickup and Placement Tool
Sizzix Curved Fine-Tip Tweezers
Spellbinders Glimmer Hot Foil System
Spellbinders Platinum Die Cutting And Embossing Machine
Bearly Art Precision Craft Glue
Tim Holtz Tonic Craft Mini Snips
Misti Precision Stamper Tool
Waffle Flower 6.5×8.5 Grip Mat
Simon Says Stamp Blending Brushes Small
Lawn Fawn Bone Folder
Scotch 3M Post-It Masking Tape
Versamark Clear Embossing and Watermark Ink
Hero Arts Silver Embossing Powder
Hero Arts Gold Embossing Powder
Simon Says Stamp Anti Static Powder Brush Tool
Scrapbook Adhesives Thin Foam Squares
Spellbinders Glimmer Hot Foil Roll Satin Gold
Spellbinders Glimmer Hot Foil Roll Silver
Simon Says Stamp Pawsitively Saturated Inks:
* Field
* Kale
* Cheeky
* Spring
* Lucky
* Mocha
Distress Inks
* Lumberjack Plaid
* Tumbled Glass
* Faded Jeans
Cardstock from my stash
