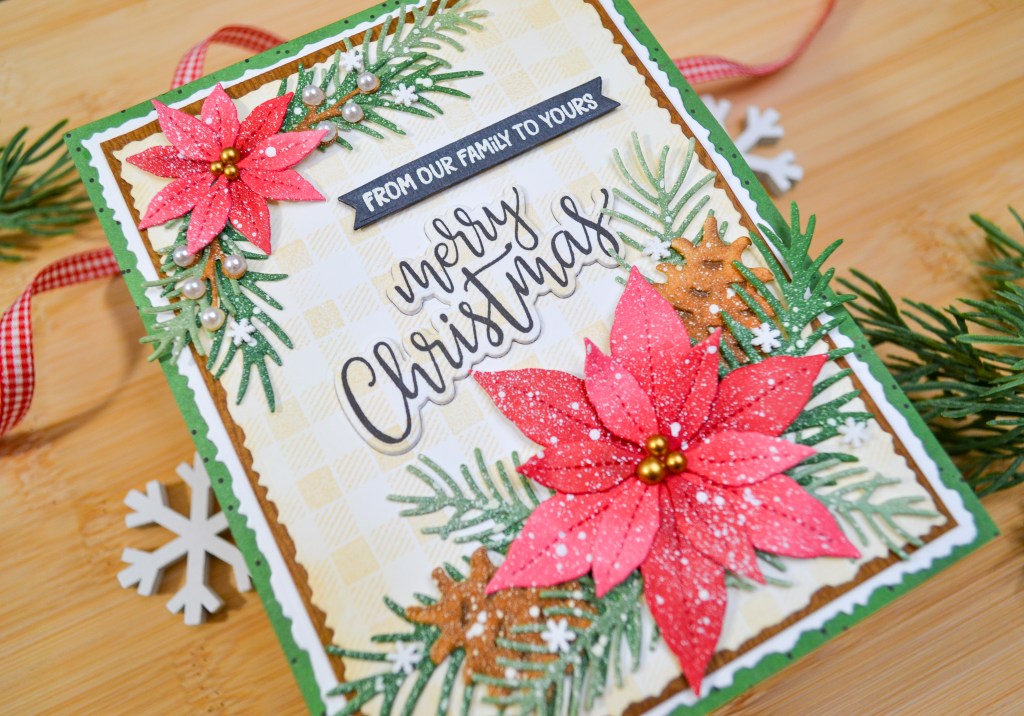
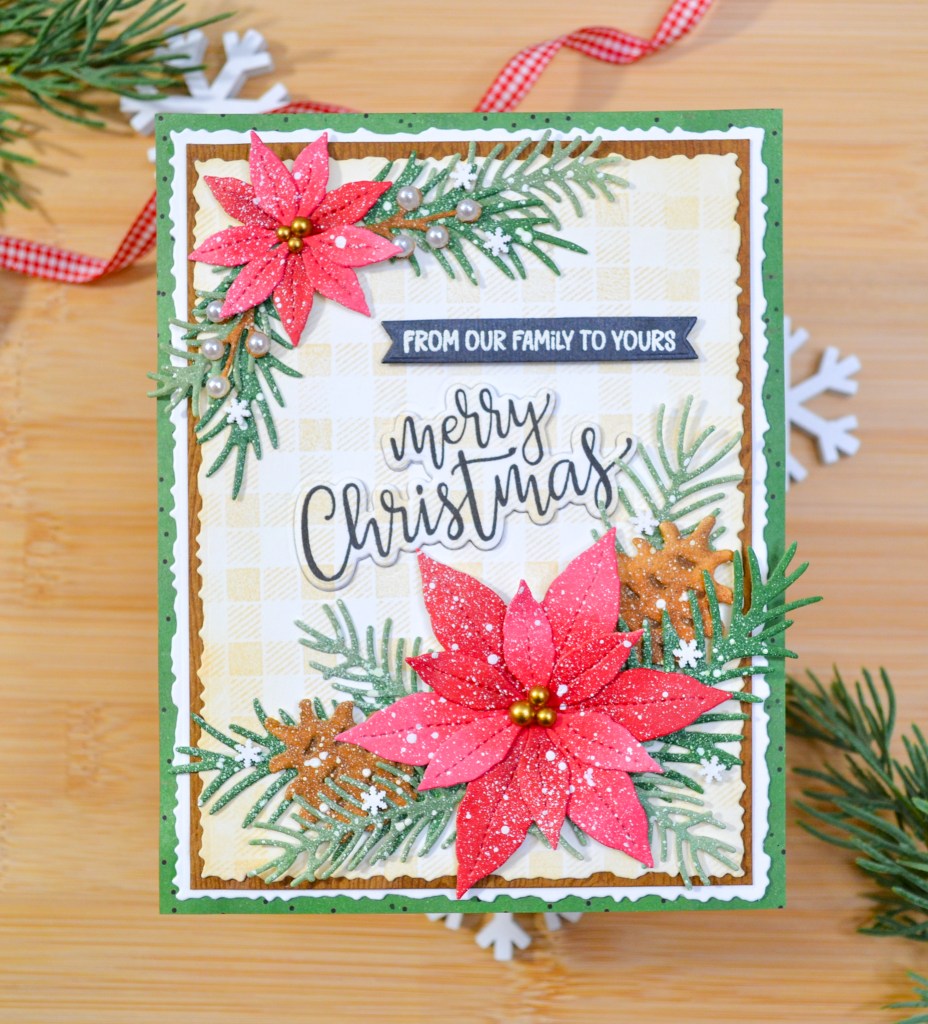
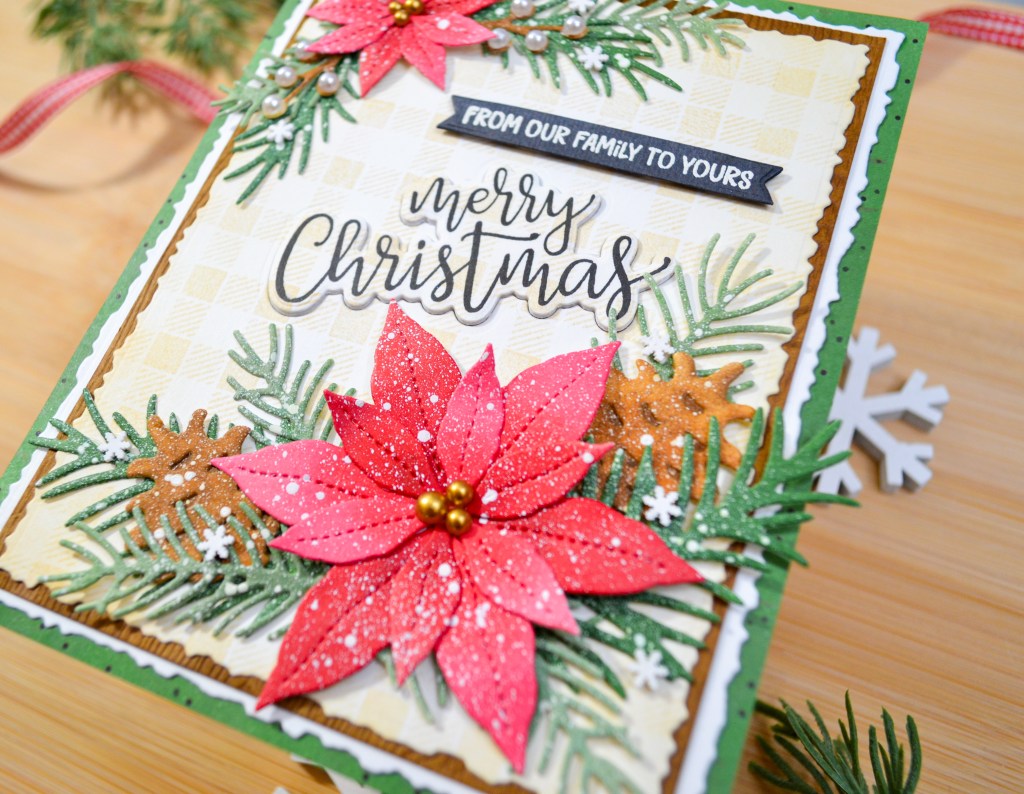
Layers, layers and more layers! This card design started with the gingham background that I stamped, using a small border stamp, (from a March 2018 Simon Says Stamp kit!), multiple times to fill an A2 card panel. My plan was to create a wreath with a few die sets from different companies, but I didn’t want to cover too much of the background I had made, especially since I didn’t mess up and had aligned everything perfectly the first time through! So, I created two swags with these layered poinsettia dies.
The poinsettias, from Concord and 9th’s Fresh Cut Florals Edition 4, have multiple layers that I shaped and curled for even more dimension. I added greenery, pinecones, and a few berries to complete the swags. All the die cuts are inked with blending brushes and then given the frosty snow treatment using thinned gouache and a toothbrush. I just love the frosty, wintery look of these die cuts. It’s such a quick and easy technique but gives you such impressive results!
I layered wood grain cardstock and patterned paper with a couple of deckled-edged layers to create some texture and interest. A scripty sentiment, gold satin baubles, (so perfect for the poinsettia centers!), and white clay snowflakes are the finishing details for this layered card design.
All the steps and supplies for this card are listed below. Happy crafting friends!
STEPS
1.) Create the background by stamping the gingham pattern in Antique Linen Distress Ink on an A2, white card panel. Die cut with the second-largest frame (4″ x 5 1/4″) from the Nesting Deckle A2 die set from Hello Bluebird and set aside.
2.) From white cardstock, die cut the poinsettia layers, the greenery, berry branches and pine cones. With small and detail blending brushes, ink the die cuts with your favorite ink colors. I used three shades of red for the poinsettias, alternating the colors with each layer and using a detail brush to deepen and darken the color near the centers. For the greenery, I chose two greens per pine bough, some have two lighter, grayish-greens and others, two darker forest greens. For a little added texture, I used a sea sponge to dab some of the darker greens onto the pine boughs after inking them. I used the same technique for the pine cones and branches, choosing two shades of brown and then dabbing on some of the darker color with a sea sponge.
3.) Using thinned white gouache and a toothbrush, I sprayed all the die cuts for a frosty, snowy appearance and let them dry. Once they were dried, I glued the poinsettia layers together and then shaped and curled the petals with the end of a paint brush for a little more dimension. Finally, I glued three gold baubles in the centers.
4.) Stamp, “Merry Christmas,” at an angle and in the center of the background panel from step 1. Use a coordinating die to die cut it from the panel. Using the same die, die cut it two more times from plain cardstock, stack and glue them all together. This will give some dimension to the sentiment when we assemble the card. Heat emboss the sentiment strip in white on dark gray cardstock and die cut using a coordinating die. Set these aside.
5.) Trim a piece of woodgrain cardstock to slightly larger than the background panel. Use Distress Ink and a blending brush to deepen and darken the edges. I used Gathered Twigs.
6.) Die cut the largest frame (4 1/4″ x 5 1/2″) from the Nesting Deckle set from white cardstock. Trim a piece of patterned paper, I used a green paper, to 4 1/2″ x 5 3/4″. The final card design will be slightly larger than A2. An A6 or an A7 envelope will accommodate this card or you can skip one of the background layers to keep it the smaller A2 card size.
7.) Assemble the card by centering each background layer and using liquid adhesive to secure them together. Start with the largest layer, the patterned paper, add the white deckle-edged layer, then the woodgrain cardstock and finally the gingham- stamped panel.
8.) Inlay the stacked “Merry Christmas” die cuts in the top, gingham layer that was die cut in step 4. Use liquid adhesive to attach the stacked die cuts and for all the elements for the swags. I attached the poinsettias first and then tucked the greenery and things around them. I trimmed things if needed to fit the scale and design.
9.) Attach the sentiment strip with thin foam squares. With glue, attach white pearls to the branches for winter berries and white clay snowflakes here and there.
SUPPLIES
Hello Bluebird Nesting Deckle A2 Dies
Hello Bluebird Holly and Pine Die
Concord and 9th Fresh Cut Florals Edition 4
Neenah 110# Classic Crest Cardstock Solar White
Simon Says Stamp Kraft Woodgrain Cardstock
We R Makers Quickstik Precision Pickup and Placement Tool
Sizzix Curved Fine-Tip Tweezers
Spellbinders Platinum Die Cutting And Embossing Machine
Bearly Art Precision Craft Glue
Tim Holtz Tonic Craft Mini Snips
Misti Precision Stamper Tool
Waffle Flower 6.5×8.5 Grip Mat
Scotch 3M Post-It Masking Tape
Simon Says Stamp Blending Brushes Small
Waffle Flower Shader Brush 0+
Hero Arts Intense Black Ink
Hero Arts White Detail Embossing Powder
Versamark Clear Embossing and Watermark Ink
Simon Says Stamp Brush Powder Tool
Honey Bee Stamps Holiday Pearls
Trinity Stamps Gold Satin Baubles
Trinity Stamps Vanilla Sugar Snowflakes Sprinkles
Sentiments from Stamptember 2022 Simon Says Stamp and Honey Bee Stamps collaboration
Simon Says Stamp Pawsitively Saturated Inks
* Sage
* Kale
Distress Inks
* Bundled Sage
* Rustic Wilderness
* Gathered Twigs
* Antique Linen
Hero Arts Hero Hues
* Cherry
* Pale Tomato
* Caramel
Gina K Cherry Red Ink
Pine Boughs
* paired Bundled Sage and Sage
* paired Rustic Wilderness with Kale
Poinsettias – Alternating layers
* Paired Pale Tomato and Cherry
* Cherry and Cherry Red
Pine Cones and Branches
* Gathered Twigs and Caramel
Background _ Antique Linen
