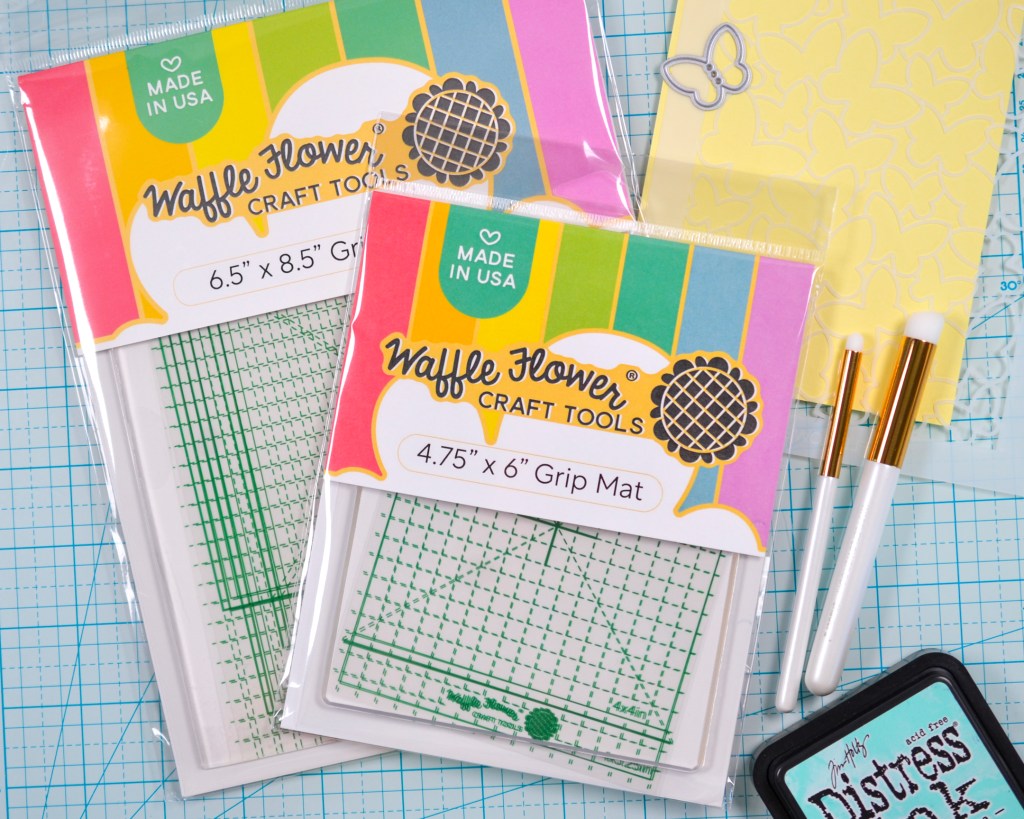
Woo Hoo! The re-launch of the Waffle Flower Grip Mats is live, and you can get yours now! I’m so excited to share with you how awesome these Grip Mats still are and how, I believe, they are an invaluable addition to your craft room.
I still have and still use my original Grip Mat and I love it! Grip Mats have changed the game when it comes to stenciling, stamping, and inking die cuts. All things I love to do when creating. Their ability to effortlessly hold cardstock and stencils in place without tape or adhesives is amazing, and now I couldn’t imagine these crafty techniques without them.
Since the new mats are made using the same high-quality material, they perform just as well as the original versions. The difference is that they may feel a bit stickier than the originals, and the Printed Grid guide sheet is a bit smaller for a better fit on the reverse side of your mat. There are also two new sizes available, six in total, including a new small 4×4 size that I can’t wait to get my hands on. Not only is it super cute, but it’s functional too. I plan to use it for holding ink pads, but it would also be great for smaller projects. Be sure to check out Waffle Flower for all the Grip Mat bundles and suites available. Plus, their regular June product release is also happening today, and it’s such a good one! I’m eyeing you, Sketched Marigold!
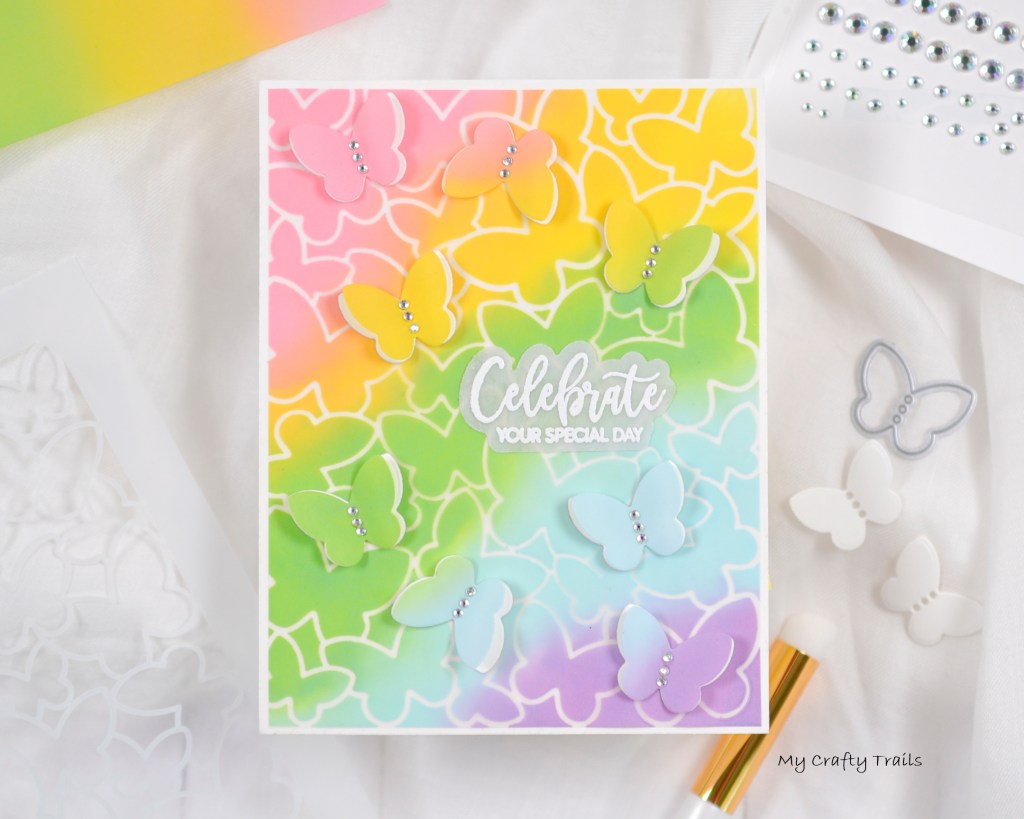
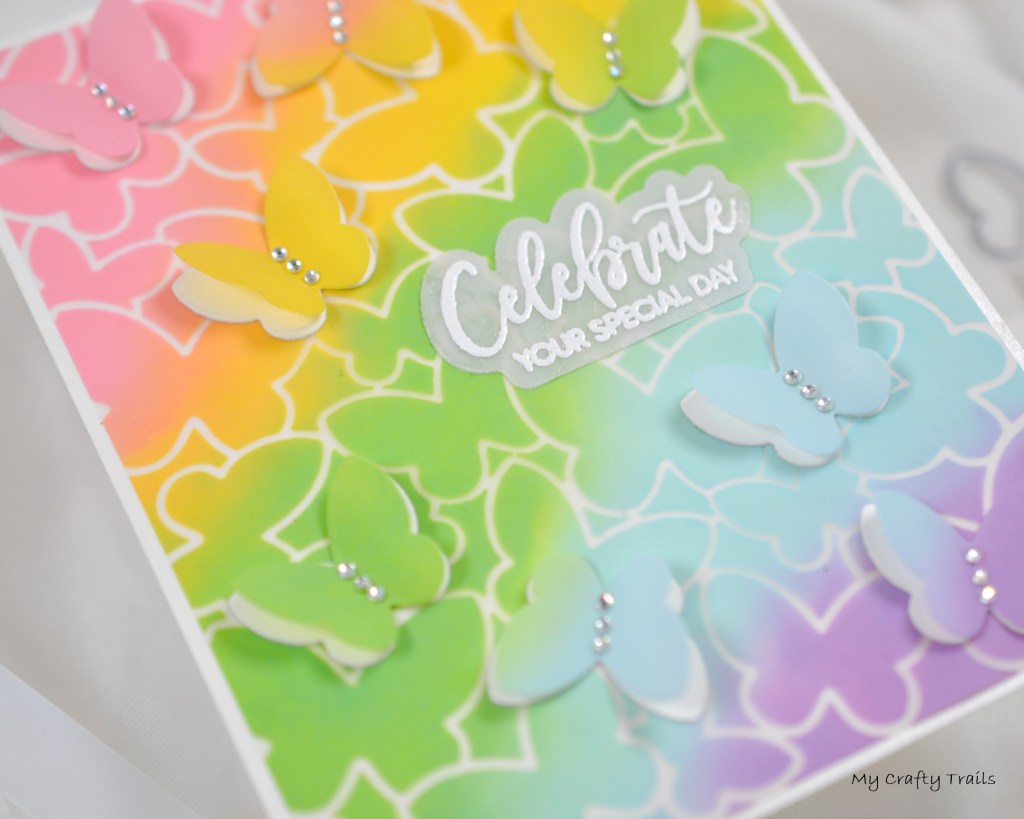
For the dreamy vellum project I’m sharing today, I used the new Grip Mats for stenciling, stamping, and holding vellum in place while I applied ink. I started with a piece of vellum trimmed slightly smaller than 4 1/4 x 5 1/2 and the Butterflies Background Stencil on my Grip Mat, both held securely in place without tape. Using a technique recently posted by the amazing Kelly Taylor, I stenciled a rainbow blend of Distress Oxide Inks on the vellum. I was worried the Oxide Inks wouldn’t dry or set all the way, but they do, and I love the soft, dreamy results you get.
Next, I created another rainbow blend of Distress Oxides on vellum but without the stencil. I used this blend to die cut multiple butterflies using the small Dotted Butterflies Die. I also die cut multiple butterflies from white cardstock to layer with the vellum ones. I used 1/8″ double-sided tape down the center of the white cardstock butterflies and then attached the vellum butterflies, bending the wings up a bit to give them some dimension. For a little sparkle, I added tiny gems along the fold, securing them with liquid adhesive.
To attach the stenciled vellum to a white A2 cardstock panel without visible adhesive, I used Sizzix Adhesive Sheets. When I use these sheets, I never run them through my die cut machine as intended; I just lay whatever I want to be sticky on the adhesive sheet, lightly press, and lift. This time, I applied the adhesive to the white cardstock and then laid the stenciled vellum panel on top. Then, I attached the small butterflies with liquid adhesive.
To finish my card, I used my Misti and the new Grip Mat to stamp a sentiment from the Waffle Flower Essential Celebrations Combo on vellum with clear embossing ink. Then I heat embossed the sentiment with white embossing powder before die cutting it with the coordinating dies. I again used the adhesive sheets to attach the vellum sentiment to the card front.
That’s it for today’s project. I hope you’re inspired to create something beautiful and maybe even try out a new technique, like Oxides on vellum! Whatever technique you choose, a Grip Mat will be your best friend. Be sure to check out all the new release items over at Waffle Flower. Thanks for stopping by!
🌼WAFFLE FLOWER SUPPLIES🌼
Waffle Flower Butterflies Background Stencil
Waffle Flower Dotted Butterflies Die
Waffle Flower Essential Celebrations Combo
Waffle Flower New 6.5×8.5 Grip Mat

ADDITIONAL SUPPLIES
Neenah 110# Classic Crest Cardstock Solar White
We R Makers Quickstik Precision Pickup and Placement Tool
Simon Says Stamp Place and Score Embellishment Wand
Simon Says Stamp Place and Pierce Embellishment Wand
Sizzix Curved Fine-Tip Tweezers
Spellbinders Platinum Die Cutting And Embossing Machine
Misti Precision Stamper Tool
Bearly Art Precision Craft Glue
Tim Holtz Tonic Craft Mini Snips
Lawn Fawn Bone Folder
Scotch 3M Post-It Masking Tape
Simon Says Stamp Blending Brushes Large
Simon Says Stamp Anti Static Powder Brush Tool
Simon Says Stamp Embossing Ink Clear
Hero Arts White Detail Embossing Powder
Scor-Tape 0.125” Crafting Tape
Sizzix 6×6 Adhesive Sheets
Simon Says Stamp White A2 Side Fold Scored Cards 120#
Simon Says Stamp Vellum
Tim Holtz Distress Oxide Ink Pad Worn Lipstick
Tim Holtz Distress Oxide Ink Pad Mowed Lawn
Tim Holtz Distress Oxide Ink Pad Mustard Seed
Tim Holtz Distress Oxide Ink Pad Tumbled Glass
Tim Holtz Distress Oxide Ink Pad Dusty Concord

Christina, one of my favorites! keep making these
beautiful cards.
LikeLiked by 1 person
Thank you!
LikeLike