
Hello! I have another project to share with you today featuring some of the newest products over at Waffle Flower Crafts. I’m loving this new Far, Far Away release more than I thought I would, so much so that I skipped over some things from the last release so I could start creating with this one! For a dreamy fairy tale design, I paired the incredible new Open Book Die, complete with scripty debossed details, with a dark background that I stamped with the new Script Texture Stamp Set. I pulled out the Postage Collage Rose Stencil from last year to add a little flourish to my book pages and finished things up with some goodies from my stash. Keep reading to see how this fantastic card design came together. Any project-specific products will be listed and usually linked below, and you can find my favorite everyday supplies here. Thanks so much for taking the time to read all about my latest paper crafting project!
Waffle Flower products:
Open Book Die
Script Texture Stamp Set
Postage Collage Rose Stencil
Other products:
Mama Elephant Emerald Package Creative Cuts – scallop frame
Spellbinders Jan. 24 Stitching Die of the Month – Bee Stitched – flowers
CZ Design Birthday Basics – sentiment
Honey Bee Stamps Across the Miles – small scripty greeting
Background:
Simon Says Stamp Soft Navy Cardstock
Distress Oxide Ink – Tea Dye
Distress Mica Stain – Crooked Broomstick
Die cuts:
Lawn Fawn Vanilla Malt Cardstock
Various cardstock scraps
Distress Ink – Brushed Corduroy
Distress Ink – Antique Linen
Distress Ink – Frayed Burlap
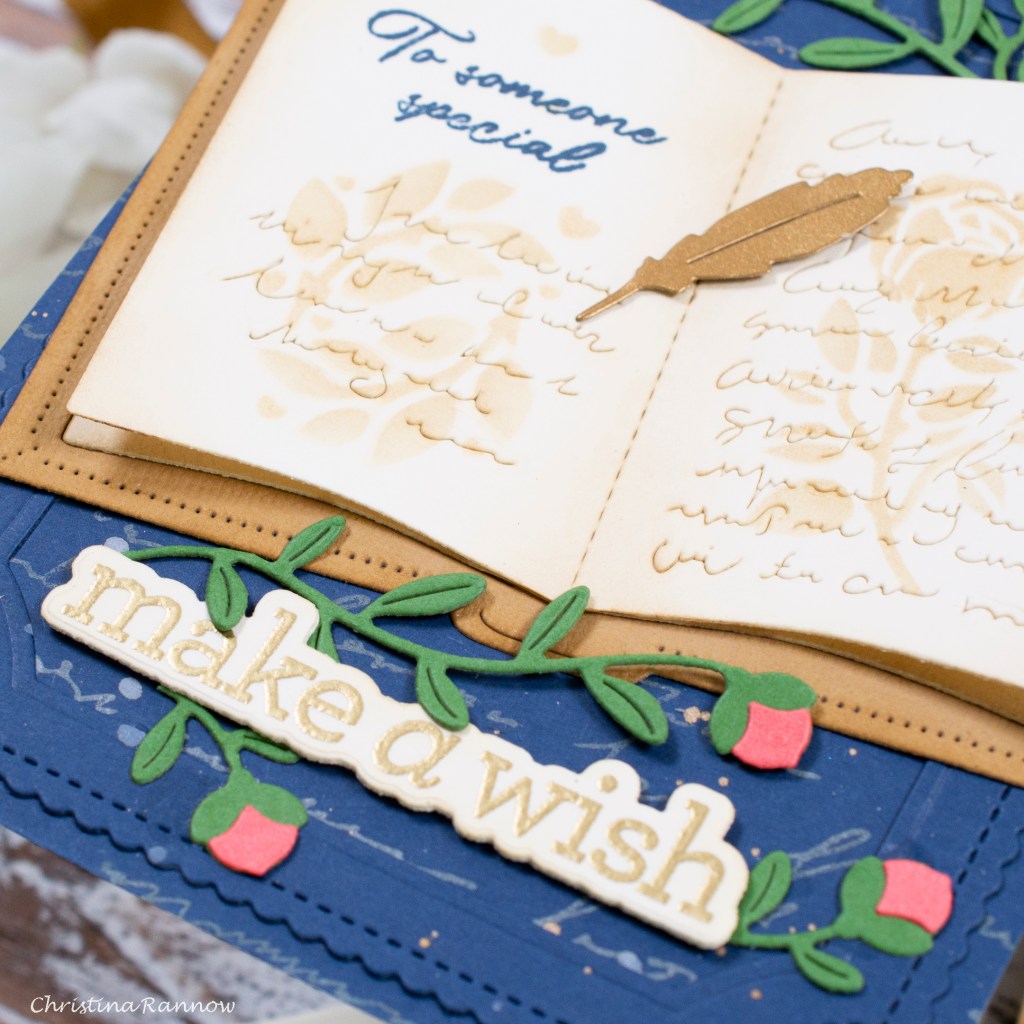
I started by creating the background. First I trimmed Soft Navy cardstock to 4 1/4 x 5 1/2 inches and stamped it with the Script Texture using Tea Dye Distress Oxide Ink multiple times to cover the entire panel. Then, I die cut the frame also from Soft Navy cardstock and spattered both pieces with Crooked Broomstick Mica Stain and Tea Dye Distress Oxide ink. Once everything dried, I adhered the frame to the background panel.
My next step was to die cut all the elements for my card design, starting with the open book. For the book pages, I die cut the book twice from Vanilla Malt cardstock and snipped away the book cover. Then I lightly stenciled the rose and leaf details with Brushed Corduroy ink and stamped a small greeting with Soft Navy ink on one set of pages before using the script die from the Open Book set to deboss the pages. For the book cover, I die cut the book again from a textured brown cardstock to look like leather and inked the edges with Frayed Burlap and Brushed Corduroy. Finally, I assembled the book, securing everything with liquid adhesive and attaching the top set of book pages down the center only and then slightly bending the pages for a dimensional element. The flowers were die cut from scrap green and pink cardstock, and the quill from a metallic gold cardstock.
With everything die cut and assembled, I attached everything to my background panel. My final step was to stamp and heat emboss a sentiment with gold embossing powder on Vanilla Malt cardstock and die cut it with the coordinating die before attaching it to my card design.

