
Hi friends! It’s release day over at Pretty Pink Posh, and the new summer and beach-themed collection is making a splash! There are three awesome new shaker dies in this release, including the beautiful Seashell Shaker that I paired with the new Seashell Background stencil for a beach-inspired card perfect for someone spe-shell ! Below you’ll find a supply list and all the details about how I used those supplies to create this seashell shaker celebrating the new summertime release from Pretty Pink Posh. Let’s dive in!
PRETTY PINK POSH SUPPLIES
Seashell Shaker Dies
Seashells Stamp Set
Seashells Coordinating Dies
Seashell Background Stencil
Sentiment Strips Stamp Set: Summer
Beach Town Clay Confetti
Sea Foam Pearls
Sentiment Strips Dies
Stitched Torn Rectangle Dies
OTHER SUPPLIES
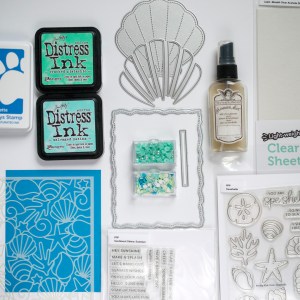
Distress Ink Cracked Pistachio
Distress Ink Salvaged Patina
SSS Pawsitively Saturated Ink Cadette
Distress Mica Stain Juniper Berry – not pictured
Shimmer Spray
SSS Island Blue Cardstock

I started by creating the background for the shaker card. First, I die cut a white cardstock panel using the largest Stitched Torn Rectangle and then stenciled it using the Seashell Background and Cracked Pistachio ink. To finish the background, I spattered it with the Juniper Berry Mica Stain for some contrasting shimmer splatter.
Next I constructed the shaker. First, I die cut the elements for the seashell, including the frame and the main body piece, from white cardstock. Then I ink blended them using the Distress inks and the SSS ink listed above and spritzed them with the shimmer spray for a pearlescent look, perfect for a seashell. Next, I attached a piece of acetate to the reverse side of the shell frame to be the shaker window and die cut the inner shell from the stenciled background panel to be the shaker window opening. You can see both in the snapshot below.

To create the base of my shaker card (pictured on the bottom right), I die cut the Stitched Torn Rectangle again and attached the main body of the seashell with glue, being sure to align it with the shaker window opening die cut from the stenciled panel (pictured in the bottom middle). Then I attached foam tape around the shell, creating a well, and then across the rest of the rectangle panel, too.
Next, I attached the shaker window, the shell frame with the acetate (pictured in the bottom left), over the shaker window opening and secured it with glue. Then I filled the shaker well with the clay confetti and a few pearls before placing the window panel onto the shaker base panel. Since both panels were die cut from the largest Stitched Torn Rectangle, it was easy to line everything up!

With the shaker component completed, I moved on to the last few details. First, I mounted the shaker on an A2 Island Blue cardstock panel. Then, I heat embossed a couple of sentiments with white embossing powder on more Island Blue cardstock before die cutting them with the coordinating die and a sentiment strip die. Lastly, I attached the sentiments along with a scattering of pearls and a few clay confetti pieces.
Thank you so much for stopping by and reading all about my beach-inspired shaker card featuring products from the newest Pretty Pink Posh summer release!

