
Hello! I have another Pretty Pink Posh card to share with you today showcasing more of the new products from the latest Halloween release. This Candy Bucket is in full kitty custom and ready for Halloween night thanks to the new Halloween Bucket Addition Dies. I filled my bucket, of course, with spooky sweet things, like the new Halloween Cake Pops. Keep scrolling to find a complete supply list (these are affiliate links) as well as how I used those supplies to create this spooky sweet Halloween card!
PRETTY PINK POSH SUPPLIES
Halloween Cake Pop Dies
Halloween Bucket Addition Dies
Halloween Greetings Stamp Set
Halloween Greetings Coordinating Dies
Halloween Holder Additions Dies – web and “eek”
Candy Bucket Dies
Ghost Holder Dies – “boo” and large candy
Notched Squares Dies
Spooking Mug Addition Dies – sucker and small candy
Pinstripe Stencil
Onyx Pearls – kitty’s eyes
OTHER SUPPLIES
Distress Ink Lost Shadow – background stripe & shading on ghost
Distress Ink Black Soot – shading on bucket
Distress Ink Wilted Violet – purple shading
SSS Pawsitively Saturated Ink Sherbet – orange shading
SSS Pawsitively Saturated Ink Mist – teal shading
C9 cardstock Starfruit, Parsley, & Tidepool
Spellbinders cardstock Lilac Blossom
Lawn Fawn Black Licorice & Fake Tan
SSS Cotton Candy
Bazzill Alpaca & Pewter Dotted Swiss

I started by stenciling a white cardstock panel using the Pinstripe Stencil and Lost Shadow Distress Ink. I thought this was a nice neutral background for everything else going on in the card design. Then I layered on a notched frame that I made by using a partial die-cutting technique to elongate the Notched Square into a Notched rectangle. Perfect for framing up this little scene.
Next I got to work die-cutting all the elements for the Candy Bucket and the sweet treats that I tucked inside. I used the cardstock colors listed above and added simple shading to most of the diecuts with coordinating ink colors. Then I assembled the diecuts and attached the bucket to the background panel with foam squares. That left me a little room to tuck in all the fun candy and cake pops!
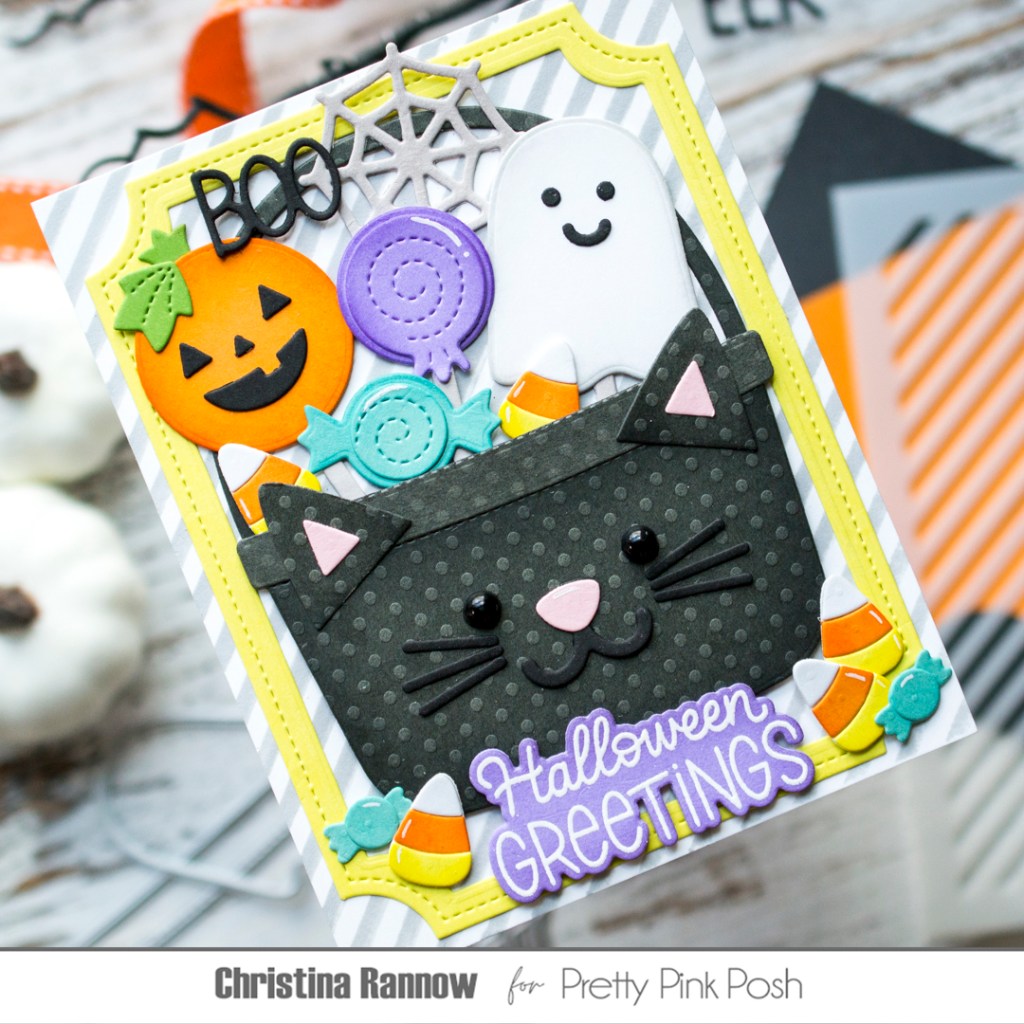
I added a spider web and “Boo” to the candy stash for some interest and a white heat embossed sentiment under the bucket. The final touches were to add pearls for the kitty’s eyes and white gel pen highlights to the candy.
Thanks so much for stopping by to take a peek at this spooky sweet Halloween card showcasing products from the latest Pretty Pink Posh release! See you again soon!
