
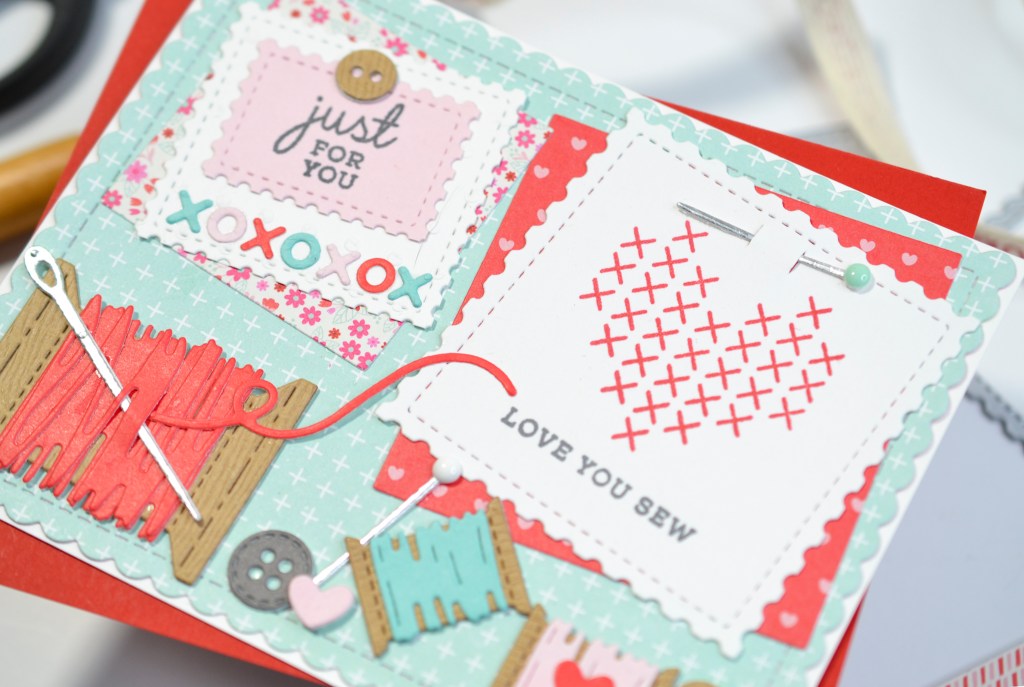
Talk about swoon-worthy! 💕 There are no words to describe how much I love this previously released Sew Lovely Bundle from Concord and 9th. Just look at those spools of thread, with the needle and pins, the little buttons, and not to mention the cross-stitched heart! But maybe I’m a tad biased because I also love cross-stitching.
I’ve already made two cards with this set, and there could be more projects in the works. It will be hard to get this one out of my “in” box.
The first project I’m sharing is this super sweet Valentine’s Day card with lots of pink and red, and plenty of hearts. For added interest, I used woodgrain cardstock for some of the elements and also tucked in some pretty patterned papers. Everything in my design is paper, except the enamel dots on the pins. No other fancy embellishments needed!
This project could easily be a Mother’s Day card or if you change up the sentiments, a birthday or thank you card. Stay tuned to see what my next project is using this bundle. Thanks for stopping by my little happy place ❤️
More details listed below!
STEPS
1.) With an A2 scallop frame, die cut the background from patterned paper.
2.) Die cut the elements from the Sew Lovely bundle. I chose cardstock and patterned papers in reds, pinks, and teals. I used woodgrain cardstock for the spools and some buttons, and matte silver for the needle and pins.
3.) Use liquid adhesive to assemble the spools of thread and to attach enamel dots to the heads of the pins. Secure the needle in the large spool of thread with glue.
4.) Use the tag die included in the set to die cut white cardstock and then stamp the cross-stitched heart in red and the sentiment in charcoal gray. Carefully slide one of the pins through the slit in this tag. Secure with glue.
5.) I die cut the Waffle Flower Crafts Postage Collage Die in white and pink cardstock for the smaller tags. I stamped another sentiment on the pink tag in charcoal gray and added some XO’s to the white tag that I die cut using the My Favorite Thing’s Tag Builder Blueprints 5.
6.) I die cut patterned papers using square nesting dies and secured them behind the tags with glue.
7.) Arrange and secure all the elements on the scallop background panel with liquid adhesive and/or foam squares. Attach everything to an A2 side-fold card base.

SUPPLIES
Concord and 9th Sew Lovely Bundle
Honey Bee Stamps Scallop A2 Card Frames
Waffle Flower Crafts Postage Collage Die
Hero Arts Square Infinity Dies
My Favorite Things Tag Builder Blueprints 5 Die-namics
Simon Says Stamp Kraft Woodgrain Cardstock 111 lb
Simon Says Stamp Matte Silver Cardstock
We R Makers Quickstik Precision Pickup and Placement Tool
Simon Says Stamp Place and Pierce Embellishment Wand
Sizzix Curved Fine-Tip Tweezers
Spellbinders Platinum Die Cutting And Embossing Machine
Misti Precision Stamper Tool
Waffle Flower 6.5×8.5 Grip Mat
Bearly Art Precision Craft Glue
Tim Holtz Tonic Craft Mini Snips
Lawn Fawn Bone Folder
Scotch 3M Post-It Masking Tape
Scrapbook Adhesives Thin Foam Squares
Simon Says Stamp White A2 Side Fold Scored Cards 120#
Cardstock and patterned paper from my stash
