
You know those cards that just stick with you? The ones that make such an impression that you save, bookmark, and pin them? For me, one of those cards was designed by Jill D Hawkins for Waffle Flower Crafts. She used the large Lovely Rose Stencil on the Postage Collage Die, cut it apart, and then arranged the pieces back together like a puzzle. Swoon. It reminded me of beautiful tile mosaics.
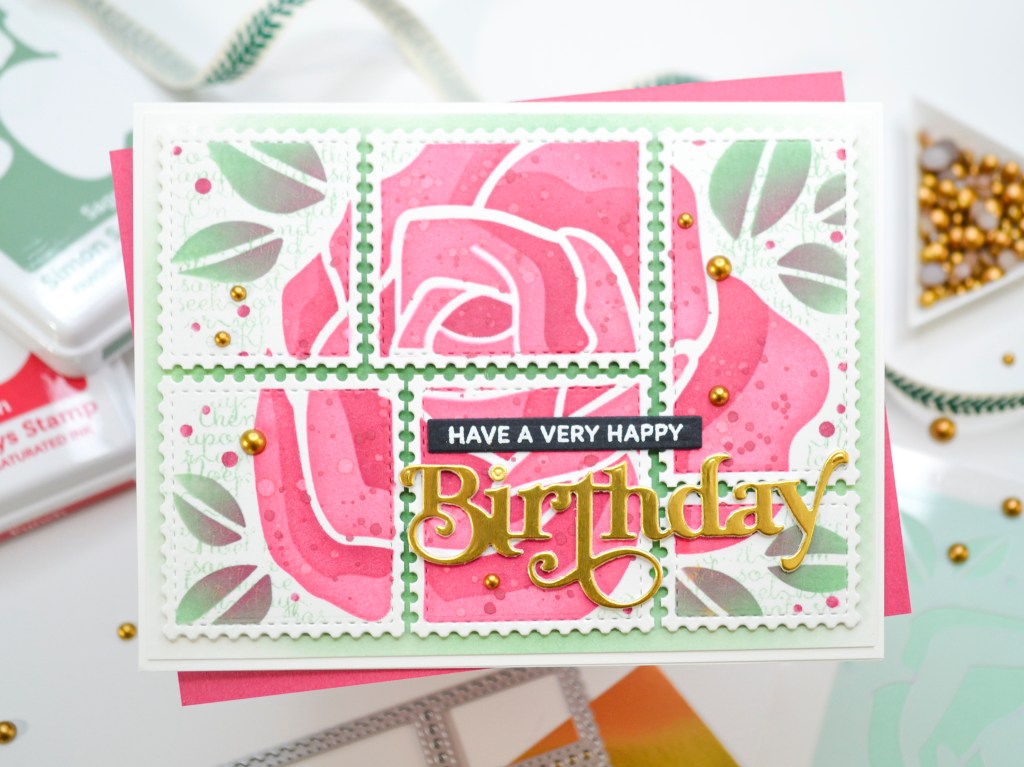
My daughter-in-law had a birthday recently, and I immediately thought of Jill’s card. I added some details of my own, like a subtle text background, masking along the individual stamp edges, and a little gold glitz. But this is my ode to her card design and to what has become a workhorse in most of our craft rooms now, the Postage Collage Die. By the way, it’s available now in all card sizes. Mini slimline, slimline, A6, A7. Add all to cart, please.
I hope I did her design justice and that my card inspires you to make something beautiful. Thanks for visiting today!
STEPS
1.) Die cut the Postage Collage frame from white cardstock. Using thin strips of low tack tape, mask the edges of the individual stamps along the stitching detail.
2.) Stencil both layers of the Lovely Rose Stencil. I used Pawsitively Saturated Inks that have a water reactive quality, in two shades of pink and two shades of green.
3.) Add splatter. After cleaning, replace stencil layer 1 and splatter the rose with water and the darker pink ink color. The stencil will act as a mask for the rest of the image and concentrate the splatter on the rose.
4.) Add text background. Still keeping the low tack tape in place, mask the rose with masking paper or scrap paper. I used a few post-it notes and didn’t worry about it being perfect. Then, stamp the panel with a text background in the lighter green color.
5.) Remove the rose mask and the low tack tape. Cut along the perforated lines of the Postage Collage frame, creating individual stamps.
6.) Create the background. Ink a card panel measuring 4 x 5 1/4 with the green inks, concentrating the darker color in the center and blending out to the lighter color.
7.) Create card front. Arrange the individual stamps on the green panel in their original frame positions, leaving the slightest gap between each piece. Secure in place with thin foam squares.
8.) Add Sentiments. Die cut a scripty sentiment from matte gold cardstock. Die cut it two more times from white cardstock and stack them together, securing with liquid adhesive. Glue the sentiment to the card front. Heat emboss a sub-sentiment in white on black cardstock and die cut with a sentiment strip. Glue this to the card front, above the scripty sentiment.
9.) Embellish and finish. Glue a few gold baubles to the card front and secure everything to an A2 side-fold card base.
SUPPLIES
Waffle Flower Crafts Postage Collage Die
Waffle Flower Lovely Rose Stencil Duo
Hero Arts Noel Print Bold Prints
Simon Says Stamp Boho Birthday Wafer Die
Pretty Pink Posh Sentiment Strips: Birthday Stamp Set
Pretty Pink Posh Sentiment Strips Dies
Neenah 110# Classic Crest Cardstock Solar White
Simon Says Stamp Matte Gold Cardstock
We R Makers Quickstik Precision Pickup and Placement Tool
Simon Says Stamp Place and Score Embellishment Wand
Simon Says Stamp Place and Pierce Embellishment Wand
Sizzix Curved Fine-Tip Tweezers
Spellbinders Platinum Die Cutting And Embossing Machine
Misti Precision Stamper Tool
Waffle Flower 6.5×8.5 Grip Mat
Bearly Art Precision Craft Glue
Tim Holtz Tonic Craft Mini Snips
Lawn Fawn Bone Folder
Scotch 3M Post-It Masking Tape
Simon Says Stamp Blending Brushes Large
Simon Says Stamp Anti Static Powder Brush Tool
Versamark Clear Embossing and Watermark Ink
Hero Arts White Detail Embossing Powder
Scrapbook Adhesives Thin Foam Squares
Simon Says Stamp Very Very Low Tack Tape
Simon Says Stamp White A2 Side Fold Scored Cards 120#
Trinity Stamps Gold Satin Baubles Embellishment Mix
Simon Says Stamp Pawsitively Saturated Ink: Punch, Sangria, Aspen, Sage

That’s an American Beauty of a card!
LikeLiked by 1 person
Thank you!
LikeLike