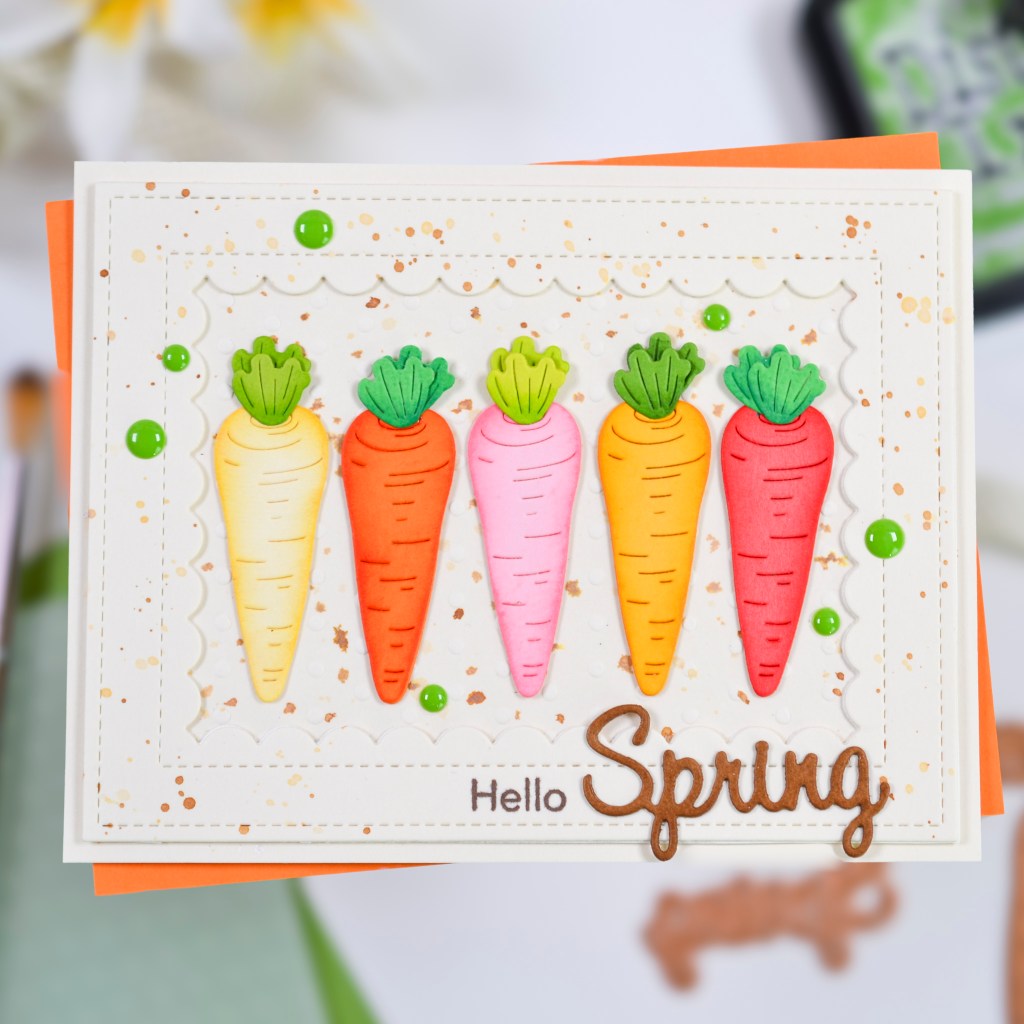
The Spellbinders February 2024 Large Die of the Month set is filled with 18 Easter and spring-themed dies, including this adorable little carrot. For this project, I chose to just die cut this little guy five times and create a rainbow of carrot colors for the quintessential spring card. I love the simplicity of this card design and how it showcases that an ordinary thing, like a garden carrot, can be beautiful. I used colored cardstock for these little beauties and added some shading with Distress Inks. The speckled, splattered background was made with more Distress Inks and Lawn Fawn’s Vanilla Malt cardstock. A sentiment and some enamel dots for embellishment are the only additions to this quick and easy spring card. All the details are listed below. Thanks for stopping by!

STEPS
1.) Create the background and frame.
▪️ Create two A2 card panels with ivory or cream cardstock.
▪️ Die cut the largest Lawn Fawn Outside In Stitched Rectangle Stackables, which is slightly smaller than A2, from one panel. Then, die cut the second largest Lawn Fawn Reverse Stitched Scalloped Rectangle from the center of the Outside In Stitched Rectangle, creating a frame.
▪️ Splatter the frame and the other A2 card panel with Antique Linen and Gathered Twigs Distress Inks.
▪️ Center the frame on the A2 card panel and secure with liquid adhesive.
2.) Create the carrots.
▪️ For each carrot, die cut once from white cardstock and then from colored cardstock. Stack the colored cardstock with the white cardstock and glue together, giving the carrots a little more substance.
▪️ Die cut two carrot fronds from colored cardstock for each carrot.
▪️ Use Distress Inks to add shading and depth to the carrots and the fronds.
▪️ Glue the carrot fronds to the tops of the carrots.
3.) Create the card panel.
▪️ Stamp Hello on the card front with brown ink.
▪️ Die cut Spring two times from white cardstock and glue together. Add brown ink to color and then glue in place.
▪️ Glue the carrots to the background.
4.) Finish the card.
▪️ Add enamel dots and secure everything to an A2 side-fold card base.

SUPPLIES
- Spellbinders Large Die of the Month Feb 2024
- Spellbinders Small Die of the Month Feb 2019 (Spring script)
- Lawn Fawn Large Stitched Rectangle Stackables
- Lawn Fawn Reverse Stitched Scalloped Rectangle Windows
- Simon Says Stamp Rainbow Splash Embossing Folder Swiss Dots
- Lawn Fawn Vanilla Malt Cardstock
- Neenah 110# Classic Crest Cardstock Solar White
- We R Makers Quickstik Precision Pickup and Placement Tool
- Simon Says Stamp Place and Score Embellishment Wand
- Simon Says Stamp Place and Pierce Embellishment Wand
- Sizzix Curved Fine-Tip Tweezers
- Spellbinders Platinum Die Cutting And Embossing Machine
- Misti Precision Stamper Tool
- Waffle Flower 6.5×8.5 Grip Mat
- Bearly Art Precision Craft Glue
- Tim Holtz Tonic Craft Mini Snips
- Lawn Fawn Bone Folder
- Scotch 3M Post-It Masking Tape
- Simon Says Stamp Blending Brushes Large
- Simon Says Stamp Blending Brushes Small
- Simon Says Stamp Blending Brushes Detail Round
- Waffle Flower Shader Brush 0+
- Simon Says Stamp White A2 Side Fold Scored Cards 120#
- The Stamp Market Enamel Dots Collection 10
- Tim Holtz Distress Ink Pad Worn Lipstick
- Tim Holtz Distress Ink Pad Gathered Twigs
- Tim Holtz Distress Ink Pad Antique Linen
- Tim Holtz Distress Ink Pad Rustic Wilderness
- Tim Holtz Distress Ink Pad Mowed Lawn
- Tim Holtz Distress Ink Pad Wild Honey
- Tim Holtz Distress Ink Pad Pine Needles
- Tim Holtz Distress Ink Pad Crackling Campfire
- Tim Holtz Distress Ink Pad Ripe Persimmon
- Simon Says Stamp Pawsitively Saturated Ink – Mocha
