I debated whether or not to get this month’s Hero Arts My Monthly Hero kit because I can’t just get all the things, lol, but in the end, I decided to get it, and I’m so happy I did. I absolutely love all the products in the Premium kit, from the stamp sets to the coordinating dies (including dies for the sentiments!!😍) to the rub-on transfers and the beautiful ink colors. The products in this kit truly inspired me. So much so that when I received it, I immediately sat down and started creating. I’ve already made three cards with this kit, and I’m not sure I’m done yet.
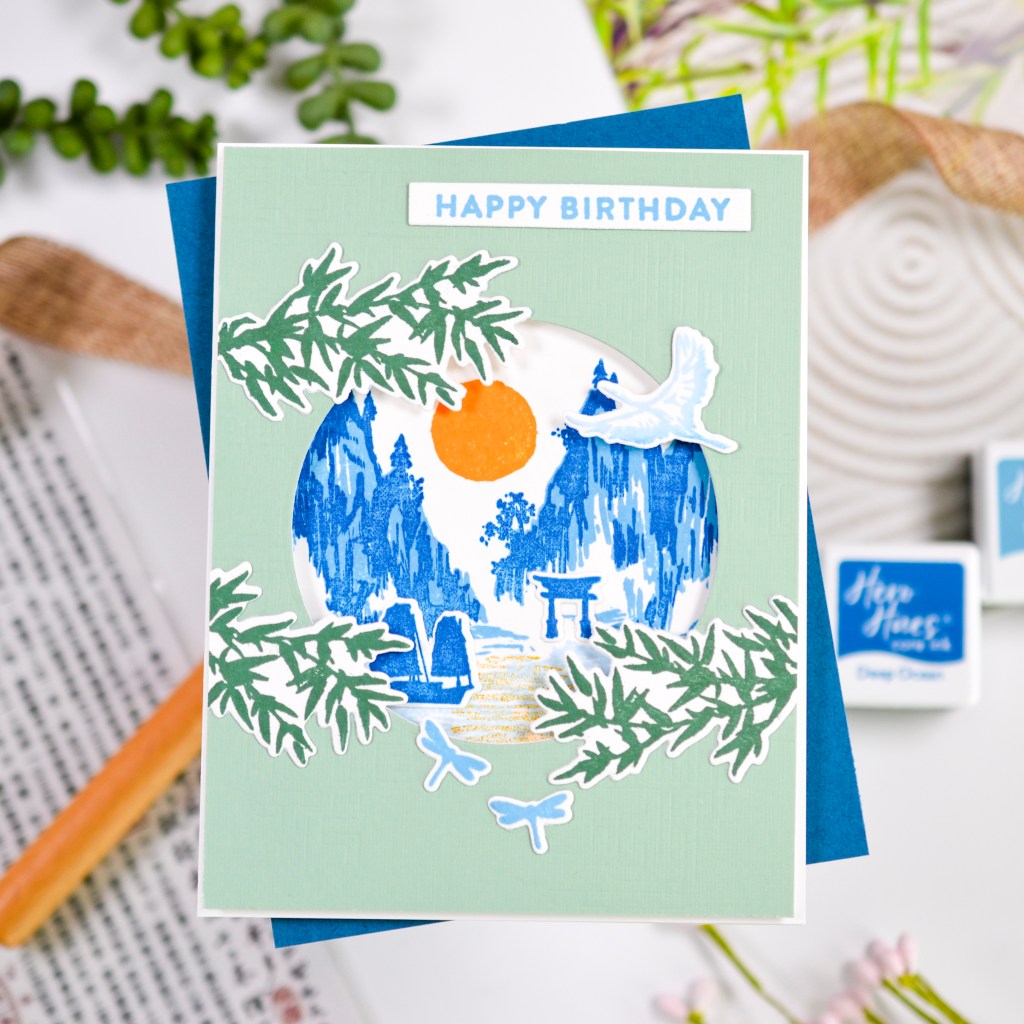
For my first project, I used the cover plate, which creates a subtle debossed pattern, and die cut a circle from the center, creating a window for the breathtaking mountain scene I made by using the stamps and some of the inks in the kit. I added dimension by popping up the window panel with foam tape and adding a few of the bamboo leaves to the outside of the scene to peek through. The crane and dragonflies round out my card design, and a simple stamped sentiment is the finishing touch.
More details are listed below, including all the supplies I used. Thanks so much for stopping by!

STEPS
1.) Create the window panel.
▪️ Die cut the cover plate from a piece of sage green cardstock, slightly smaller than A2.
▪️ Use an Infinity Circle die to die cut the center portion, creating the window.
2.) Create the background scene.
▪️ Use the window panel as a template for the placement of the scene. Then, stamp the layered mountains, the water, the sun, and the sun’s reflection directly to an A2 white card panel. I used the ink included in the set, Periwinkle and Deep Ocean, for the mountains and a lighter, icy blue for the water. I chose a tangerine color for the sun and the sun’s reflection. The reflection is second generation stamping for less intense color.
▪️ Stamp the boat and the arch on white cardstock with Deep Ocean and use the coordinating dies to die cut the images.
▪️ Glue the boat and arch in place.
3.) Create remaining elements.
▪️ Stamp the dragonflies with Periwinkle and the bamboo leaves with a darker green color. Use the coordinating die to die cut the images.
▪️ Stamp the crane with the lighter, icy blue color, adding a little of the Periwinkle and the Deep Ocean to the wings for some shading. Using a small blending brush to apply the ink to the wings before stamping produces a better blend of colors. Die cut with the coordinating die.
▪️ Stamp the sentiment on white cardstock with Periwinkle ink. Use a sentiment strip to die cut the sentiment.
4.) Assemble the card.
▪️ Apply foam tape to the reverse side of the window panel and secure to the panel with background scene, leaving a thin border around the window panel because it’s slightly smaller than A2.
▪️ Attach the remaining elements with glue and foam squares where they overhang the window. Trim the bamboo from the edges where it overhangs the card panel.
▪️ Attach everything to an A2 side-fold card base.

SUPPLIES
- Hero Arts My Monthly Hero March 2024
- Hero Arts Nesting Circle Infinity Dies
- Hero Arts Lets Celebrate Stamp Set
- My Favorite Things Skinny Strips Die-namics
- Neenah 110# Classic Crest Cardstock Solar White
- We R Makers Quickstik Precision Pickup and Placement Tool
- Simon Says Stamp Place and Score Embellishment Wand
- Simon Says Stamp Place and Pierce Embellishment Wand
- Sizzix Curved Fine-Tip Tweezers
- Spellbinders Platinum Die Cutting And Embossing Machine
- Misti Precision Stamper Tool
- Waffle Flower 6.5×8.5 Grip Mat
- Bearly Art Precision Craft Glue
- Tim Holtz Tonic Craft Mini Snips
- Lawn Fawn Bone Folder
- Scotch 3M Post-It Masking Tape
- Simon Says Stamp Blending Brushes Small
- Scrapbook Adhesives Foam Squares
- Scrapbook Adhesives White Crafty Foam Tape
- Simon Says Stamp White A2 Side Fold Scored Cards 120#
- Brass & Bliss Color Fuse Set #7 Artic Blue
- Brass & Bliss Color Fuse Set #2 Apricot
- Simon Says Stamp Pawsitively Saturated Ink Pad Kale
