
It’s been a while since I’ve made a Lawn Fawn card, and, you guys, this one makes me so happy. The sweet, summery feels of this card makes me want to start my own little strawberry patch. But, for now, I’ll have to settle for this one😊
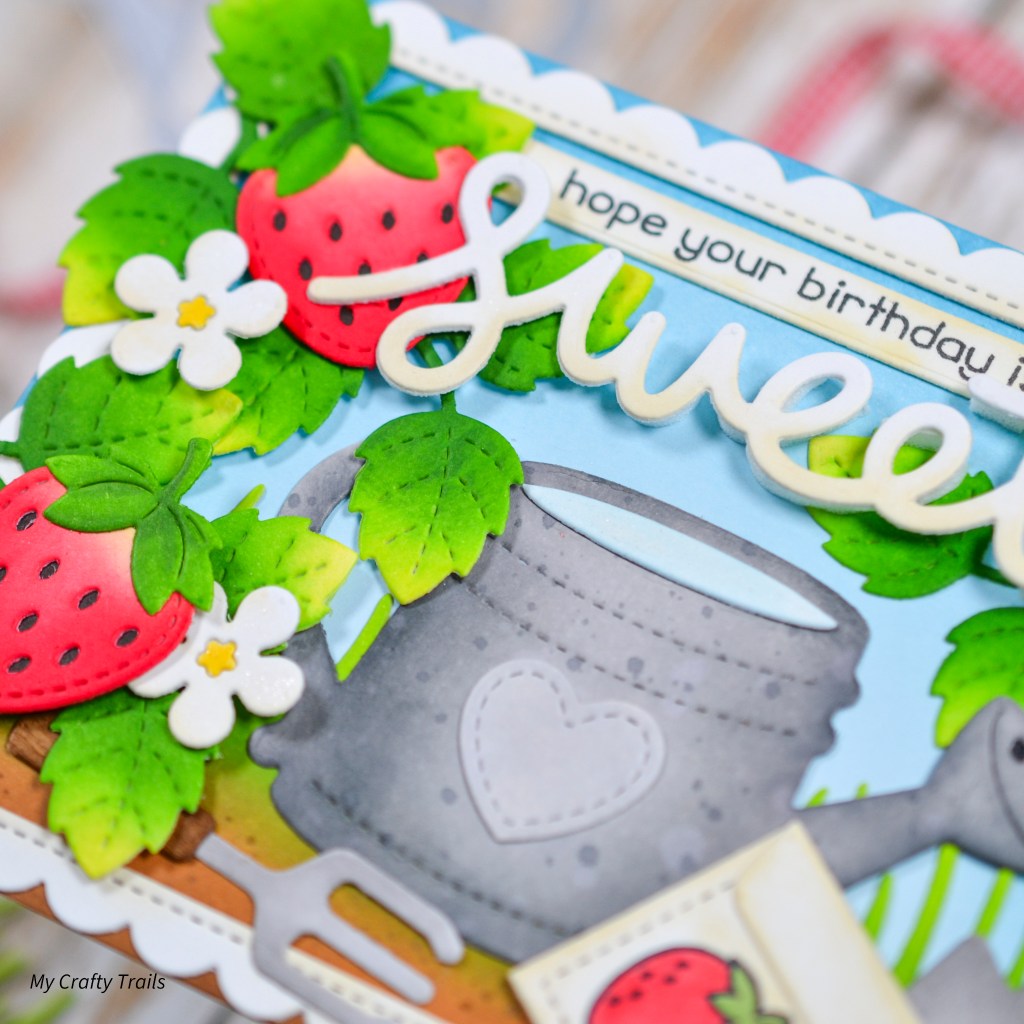
To create my little scene, I used Lawn Fawn’s Strawberry Patch set and paired it with the new Watering Can set, which has the cutest little seed packet you ever did see. I love that you can customize it to fit into any garden you want to grow. On my seed packet, I stamped a little strawberry from the How You Bean? Strawberries Add-On stamp set. I added strawberry flowers from the Outside In Stitched Strawberry set.
For most of the elements on my card, I started with white die cuts and applied layers of color with Distress Inks to achieve bright, saturated colors. I used kraft woodgrain cardstock for the handles of the tools, and for the background, I started with a light blue cardstock. To add depth and dimension to my die cuts, I used shading, color variation, and, of course, foam squares.
I finished my card with a big scripty sentiment and a touch of sparkle to some of the elements with A Wink Of Stella glitter marker. I considered some white gel pen highlights, but I’m just not the best with those pens and didn’t want to ruin my design. But if you’re skilled with gel pens, it would be a cute addition.
I hope this card gives you all the happy summer vibes that it gives me and inspires you to create your own sweet strawberry patch! All the details are listed below, including all the supplies I used. Thanks for visiting today!


STEPS
1.) Create the background.
▪️ On a 4 1/4″ x 5 1/2″ light blue cardstock panel, blend a darker blue Distress Ink around the edges, gradually blending in a medium blue ink, moving towards the center, but leaving the center the lightest blue of the cardstock.
▪️ Die cut a grassy edge to cover the bottom 1/4 of the card and apply Distress Inks, blending from green grass to brown dirt. Splatter the dirt with a darker brown color and/or green ink.
▪️ Attach the grassy edge to the bottom of the sky background, trimming if necessary, with liquid adhesive.
▪️ Die cut the largest Stitched Scallop Rectangle Frame from white cardstock two times. Lightly apply ivory or cream ink to one of the frames to tone down the stark white of the cardstock. The frame will be attached to the background and the grassy edge creates an uneven layer not allowing the frame to lay flat. To correct this, trim about a 1/4 off of the bottom of the other frame and then adhere it to the reverse side of the other full frame. The single layer at the bottom of the frame will lay flat against the grassy area while the double layer of the rest of the frame will lay flat against the sky. Secure to the frame to the background panel with liquid adhesive.
2.) Create the die cut elements.
▪️ Die cut the elements for the card from white, heavy-weight cardstock, except the handles for the tools, for those use kraft woodgrain cardstock, and the backer pieces for the strawberries and the holes in the watering can. Those I die cut from black cardstock.
▪️ Fussy cut the water for the watering can and the little mound of dirt because there aren’t dies for these.
▪️ Using a sticky or grip mat, apply Distress Inks to the die cuts. Apply darker colors around the edges of the die cuts for shading and dimension. Small and detail blending brushes are helpful for smaller areas like the strawberry tops.
▪️ After inking, splatter the watering can with water and also darker gray ink for a little texture and interest. Add splatters of dark brown ink to the dirt mound.
▪️ Assemble the die cuts, securing with liquid adhesive.
▪️ Stamp a little strawberry on the seed packet and color with alcohol ink markers.
3.) Create the sentiments.
▪️ Stamp the sentiment strip in black ink on white cardstock and die cut with a thin sentiment strip die.
▪️ Die cut the Scripty Sweet twice, and then stack and secure with liquid adhesive.
▪️ Lightly apply ivory or cream ink to the sentiment strip and the scripty text just to tone down the stark white of the cardstock.
4.) Assemble the card.
▪️ Attach the die cuts with a combination of liquid adhesive and foam squares.
▪️ Attach the scripty text with thin foam strips anywhere it doesn’t rest against a die cut.
5.) Finish the card.
▪️ Use a glitter pen to add sparkle to the water, the scripty text and the flowers.
▪️ Attach everything to an A2 side-fold card base with liquid adhesive.
SUPPLIES
- Lawn Fawn Lawn Cuts Watering Can
- Lawn Fawn Lawn Cuts Strawberry Patch
- Lawn Fawn Lawn Cuts Outside In Stitched Strawberry
- Lawn Fawn How You Bean? Strawberries Add-On
- Lawn Fawn Lawn Cuts Scripty Sweet
- Lawn Fawn Lawn Cuts Stitched Scalloped Rectangle Frames
- Lawn Fawn Stamp Set Out Of This World
- My Favorite Things Skinny Strips Die-namics
- My Favorite Things Die-Namics Tall Grass
- Neenah 110# Classic Crest Cardstock Solar White
- Simon Says Stamp Kraft Woodgrain Cardstock 111 lb
- We R Makers Quickstik Precision Pickup and Placement Tool
- Simon Says Stamp Place and Score Embellishment Wand
- Simon Says Stamp Place and Pierce Embellishment Wand
- Sizzix Curved Fine-Tip Tweezers
- Spellbinders Platinum Die Cutting And Embossing Machine
- Misti Precision Stamper Tool
- Waffle Flower 6.5×8.5 Grip Mat
- Bearly Art Precision Craft Glue
- Tim Holtz Tonic Craft Mini Snips
- Lawn Fawn Bone Folder
- Scotch 3M Post-It Masking Tape
- Simon Says Stamp Blending Brushes Large
- Simon Says Stamp Blending Brushes Small
- Simon Says Stamp Blending Brushes Detail Round
- Waffle Flower Shader Brush 0+
- Scrapbook Adhesives Thin Foam Squares
- Scrapbook Adhesives Foam Squares
- Waffle Flower Foam Strips ⅛”
- Simon Says Stamp White A2 Side Fold Scored Cards 120#
- Rainbow Splash Ink Pad Buttercream
- Zig Wink Of Stella Glitter Clear Brush Tip Marker
- Copic Sketch Markers
Stamped strawberry R35, G24
Strawberry flower centers Y17
Strawberry Ink Colors - Tim Holtz Distress Ink Pad Scattered Straw
- Tim Holtz Distress Ink Pad Worn Lipstick
- Tim Holtz Distress Ink Pad Saltwater Taffy
- Tim Holtz Distress Ink Pad Lumberjack Plaid
- Tim Holtz Distress Ink Pad Twisted Citron
- Tim Holtz Distress Ink Pad Mowed Lawn
- Tim Holtz Distress Ink Pad Rustic Wilderness
Watering Can and Tools Ink Colors - Tim Holtz Distress Ink Pad Lost Shadow
- Tim Holtz Distress Ink Pad Hickory Smoke
- Tim Holtz Distress Ink Pad Black Soot
- Tim Holtz Distress Ink Pad Tumbled Glass
- Tim Holtz Distress Ink Pad Gathered Twigs
- Tim Holtz Distress Ink Pad Ground Espresso
Background Ink Colors - Tim Holtz Distress Ink Pad Tumbled Glass
- Tim Holtz Distress Ink Pad Broken China
- Tim Holtz Distress Ink Pad Twisted Citron
- Tim Holtz Distress Ink Pad Mowed Lawn
- Tim Holtz Distress Ink Pad Tea Dye
- Tim Holtz Distress Ink Pad Gathered Twigs
- Tim Holtz Distress Ink Pad Ground Espresso
Flowers, Frame, and Sentiment Ink Colors - Rainbow Splash Ink Pad Buttercream

This is 100% certified DELIGHTFUL! I love it. It might also be 100% organic, but at least we’re certain it’s DELIGHTFUL. So cute!!
Lori S in PA
LikeLiked by 1 person
lol! Thanks so much Lori! Appreciate your kindness ❤️
LikeLike