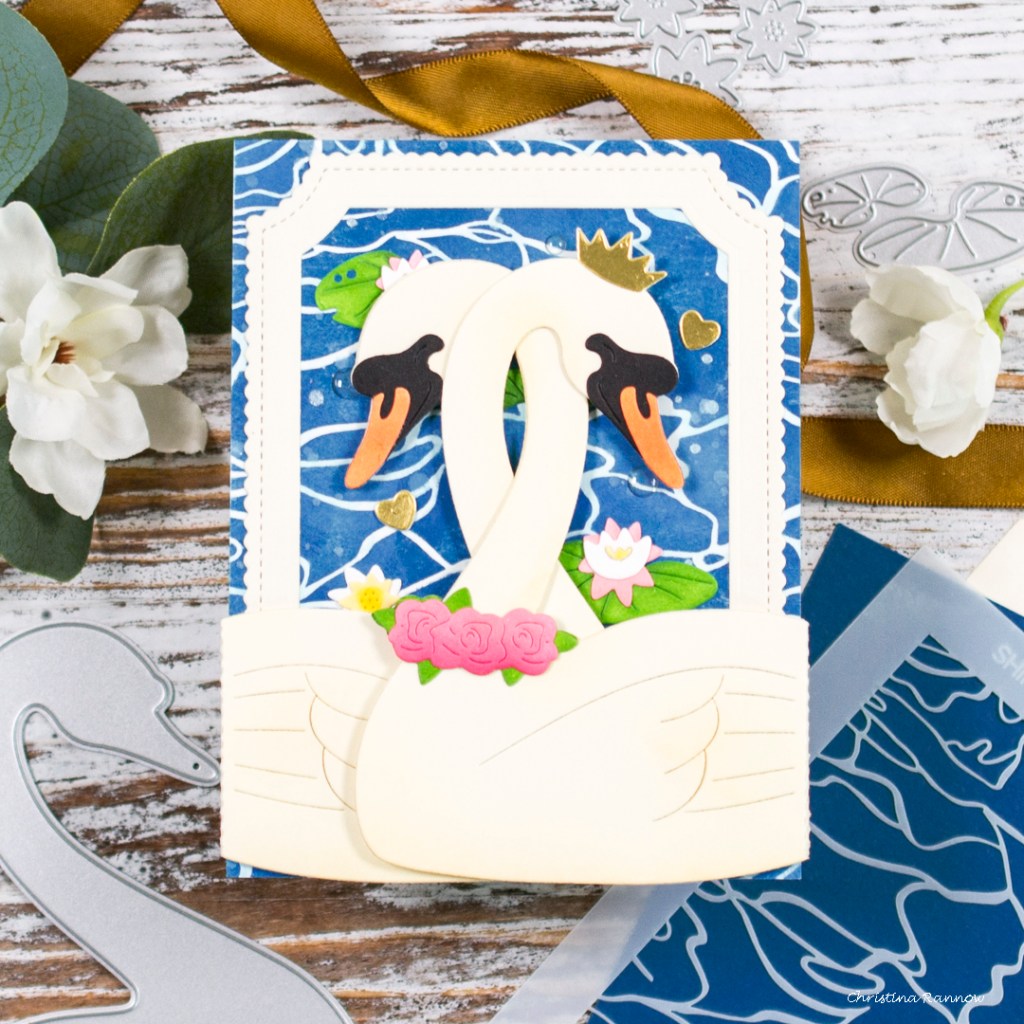
I’m sharing something a little different today. It’s an interactive card featuring the graceful Intertwined Swans from Waffle Flower‘s Better Together release. The interactive element of these beauties couldn’t be easier to assemble, and if you don’t want an interactive card design, you can just use them as regular die cuts. Take a peek at the interactive element as the swans open up to reveal a pond scene with a sentiment.

Keep reading to see how easy it really is to create this card as well as a list of project-specific products and supplies. You can find my favorite everyday supplies here. Thanks so much for stopping by to read all about my latest project featuring these graceful interactive swans! See you again soon!
Waffle Flower products
Intertwined Swans Die
Pond with Lily Pads Die
Shimmering Water Stencil
Enamel Dots – Clean & Clear
Mama Elephant Emerald Package – Frame
Lawn Fawn Fancy Wavy Banners
Lawn Fawn Henry’s Build- a- Sentiment: Spring
Distress Oxide Ink – background
Uncharted Mariner
Salvaged Patina
Distress Ink – die cuts
Mowed Lawn – lily pads
Rustic Wilderness – lily pads
Antique Linen – swans
Pawsitively Saturated Ink – die cuts
Butter – Water lilies and water lily centers
Honey – water lily centers
Cheeky – roses & water lilies
Punch – roses
Sherbet – beaks
Pearfection – frog

My first step was to create the background by stenciling the water with Uncharted Mariner on an A2 white cardstock panel. After stenciling, I lightly went over the white “ripples” with Salvaged Patina, applying the ink heavier in some areas, and then spattered the panel with plain water and with Picket Fence Studios Liquid White Snowflake Paper Splatter.
My next step was to die cut all the elements for my card design and ink them with the colors listed above. I used two colors on the lily pads and the roses to add some depth with shading. For the swans, I used vanilla cardstock and lightly inked Antique Linen just around the edges and concentrated the ink on any areas that would naturally be darker. For the face of the swans, I used black cardstock, and for the crown, I used matte gold cardstock. And the frame is die cut from vanilla cardstock.
With the background and die cutting complete, I moved on to the interactive portion of the card. The swan dies add a perforated fold line when die cutting that can easily be folded and then secured to the reverse side of your background panel. If you don’t want an interactive element, you can just snip this tab off and use the swan as a regular die cut.
To attach the swans on my card, I used double sided tape on the tabs, but you could use a liquid adhesive and clamp the tabs down with reverse tweezers while the adhesive dries. An optional step is to add the reverse die cuts of the swans to the inside so when the recipient opens them up, it’s a cleaner and more finished look, like I did here.
With the interactive element assembled, I began attaching the remaining elements to the stenciled background panel. To keep things relatively flat so as not to interfere with the interactive portion of the card, I used liquid adhesive for everything except the banner sentiment, which I heat embossed in gold, and then used thin foam strips to attach it to the panel. With everything secured my finishing details were to add a little texture to the frog with some Copic marker stippling and a few clear enamel dots for water droplets.


Brilliant! Love it.
LikeLiked by 1 person
Thank you!
LikeLike