
It’s release day over at Pretty Pink Posh, and it’s filled with the most adorable springtime and Easter-themed products, like the Build an Egg Die set that I used to create this Easter card. Decorating Easter eggs with paper is just as fun as decorating real eggs, but not quite as messy. Well, maybe. Keep reading to get all the details about creating this card as well as a project-specific supply list. You can always find my favorite everyday supplies here. Let’s start decorating!
Pretty Pink Posh Supplies
Build an Egg Dies
Easter Bucket Additions Dies – large daisy
Easter Greetings Stamp Set
Easter Greetings Coordinating Dies
Line Bursts Stencil
Scallop Frames Dies
Other Supplies
SSS Pawsitively saturated Inks – Rhubarb, Zest, Pearfection, Seafoam, Surf
PFS Paper Glaze Snowdrop White Stencil Paste

I started by creating the background for my card design. First, I blended Seafoam and Surf inks on an A2 white cardstock panel, concentrating the darker Surf color around the edges. Then, I stenciled the panel using the Line Bursts stencil with stencil paste. Once the paste was set, I added a white scallop border.
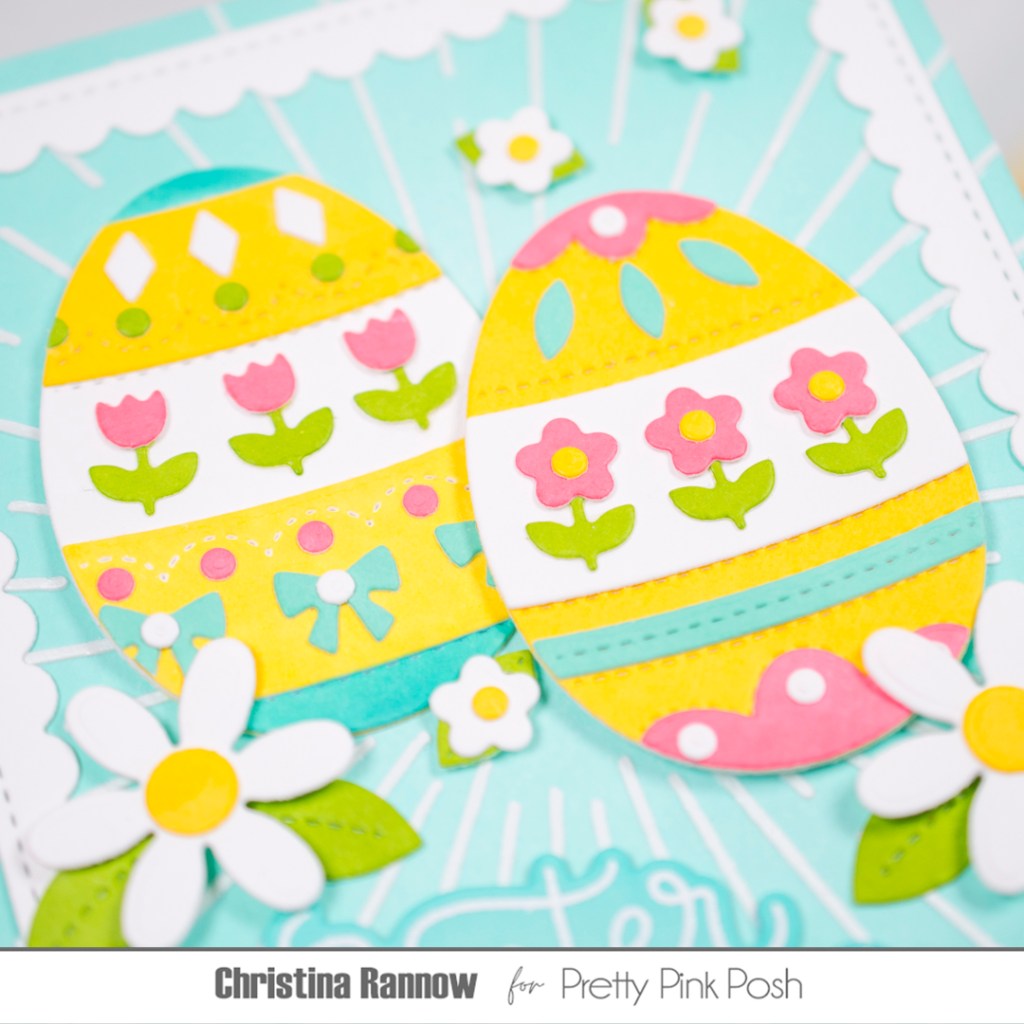
With the background completed, I got to work die cutting the elements for my card design. Instead of using colored cardstock, I inked white cardstock with the ink colors listed above and then die cut the pieces from the inked cardstock. You could also ink the die cuts individually, but since the pieces were so small, inking the cardstock before die cutting was easier and quicker. Next I decorated the eggs and attached them to the background panel before adding some white daisies to round out the design.
To finish things up, I heat embossed a sentiment in white, die cut it with the coordinating die, and then inked it with the same colors as the background.
And that’s it for this Easter card featuring the new Build an Egg set from the Pretty Pink Posh release. Thanks so much for stopping by! See you soon!


Gorgeous card—so clean and cohesive. 🙂
LikeLike
Thank you!
LikeLiked by 1 person