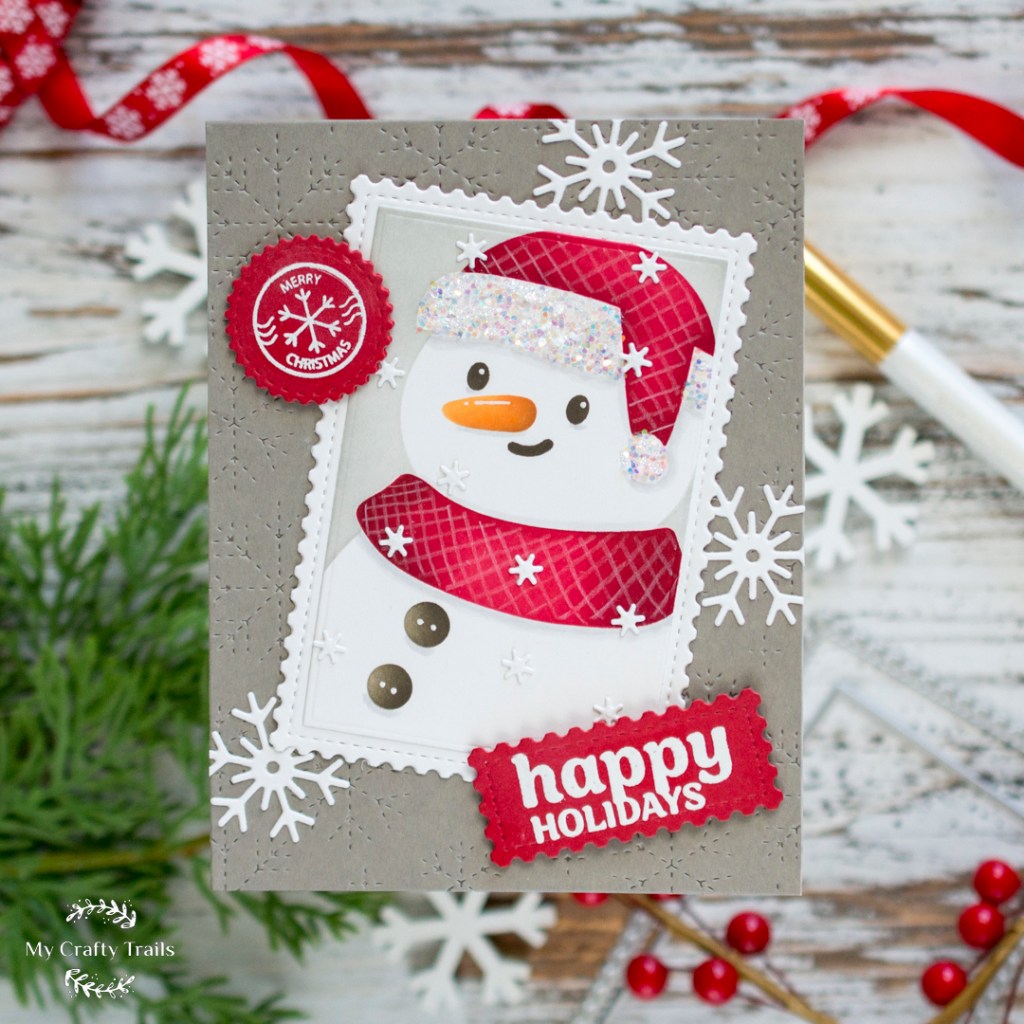
Hi friends! I’m still working my way through my inbox, and Waffle Flower’s Sneak Peek kit #8 caught my attention. This kit was a sneak peek of the September release, and man, I’m so glad I finally got around to creating with it! Not only has it been a while since I played with Waffle Flower products, but I’m loving the few things the kit included from the new Nesting Postage Collage collection! There are larger-scale postage edge dies, along with coordinating stencils and stamps for endless crafty possibilities. I started with the Nesting PC Die and the coordinating Let It Snow Stencil to create this adorable snowman for the focal point of my card design. Check out my supply list, and then I’ll walk you through how it all came together. Let’s get started!
WAFFLE FLOWER SUPPLIES
Nesting PC Die
Nesting PC Let It Snow Stencil
Dashed Snowflake Panel Die
PC North Pole Stamp Set
PC Sentiment Circle Die
Warm Wishes Stamp Set
Small Snowflake Die
OTHER SUPPLIES
Concord & 9th Cobblestone Cardstock
Birch Press Design Cherry Red Cardstock
Hero Arts Snowfall Glitter
SSS Pawsitively Saturated Ink: Cantaloupe, Sherbet, Fawn
Distress Inks: Lost Shadow, Lumberjack Plaid, Scorched Timber, Aged Mahogany
Copic Marker N1

For this card design, I started by creating the focal point. First I stenciled the snowman on white cardstock using the ink colors listed above but left the brim and the pom-pom of his hat without color. Then I die-cut the snowman image using the rectangle from the Nesting PC die set before adding some sparkle to the hat areas I didn’t stencil using a thin layer of glue and a generous dusting of glitter. I layered the snowman image onto a postage-edge rectangle diecut and then embellished the image with some fun details. I added highlights with a white gel pen, some texture to his hat and scarf with a white colored pencil, and some shadows with a Copic marker. Finally, I added snowfall to the image using small white snowflake diecuts.
My next step was to create the other elements for my card design. First I die-cut the background panel using the Dashed Snowflake Panel die. Then I heat embossed a couple of sentiments on red cardstock using white embossing powder and then die-cut them with postage-edge shapes. To bring everything together, I layered the snowman image and the sentiments onto the background panel before tucking in a few larger snowflake diecuts.

Thank you so much for stopping by to check out my holiday card featuring elements from the Waffle Flower Sneak Peek kit #8!

Oh so cute!!!
LikeLiked by 1 person
Thank you so much!
LikeLike