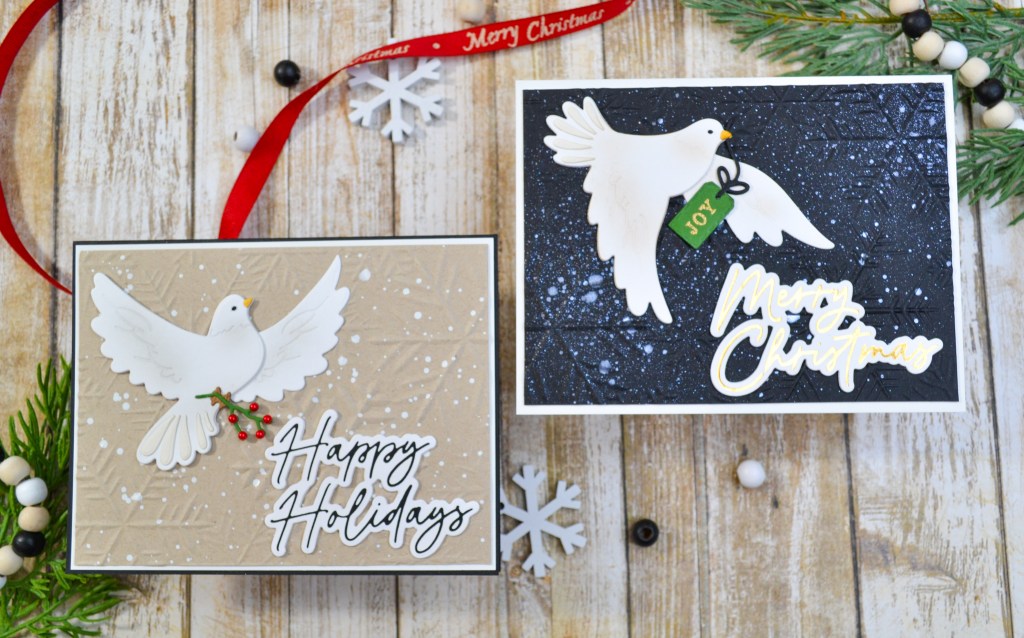
Today, I’m sharing two cards using more Lovely Layers from Honey Bee Stamps. Like I said in my previous post, I’m a big fan of this line because the results are dimensional and realistic. These doves are no exception but unlike the Lovely Layers: Deer, these have fewer dies and they came together quickly.
I used Distress Inks to do just a little shading on the doves and paired them with another embossing folder from Simon Says Stamp for the backgrounds. The backgrounds are splattered for some added interest and just because it’s fun to do! I used a mica stain on the black card and white gouache on the kraft. Both of the sentiments are hot foiled, one in gold and one in black, and are also from Honey Bee Stamps. More details are listed below, including the supplies used. Thanks for stopping by today!

STEPS
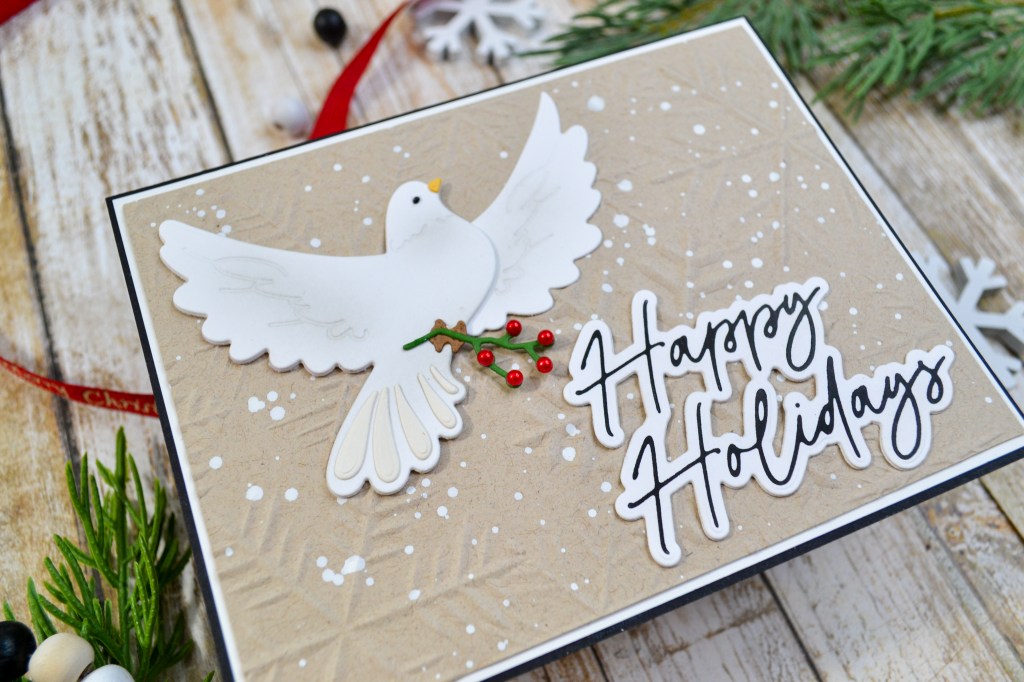
1.) I started with embossing two A2 sized card bases, one in black and one in kraft, with the Icy Snowflakes embossing folder. I barely misted the panels with water first to get a better impression while embossing. On the black panel, I lightly sprayed Frozen Fog Mica Stain and on the kraft panel, I splattered thinned white gouache with a paint brush. I set these aside to dry while I worked on the other elements.
2.) Next, I die cut the dove layers and the elements for the little tag and branch. I used white for the bodies and wings, and ivory for the detail feathers in the tails. The beaks are die cut in yellow, the eyes in black and the feet in brown. I used the same green for the tag and the branch and more black for the string of the tag.
3.) Before assembling the doves, I used Antique Linen Distress Ink to shade the dove for the black background and Lost Shadow for the dove going on the kraft. Using a small blending brush, I concentrated the ink over the embossed line details. Then, with liquid adhesive, I assembled the doves. And for just a little more dimension, I ended up die cutting the top layering piece again for both doves and stacked them before adhering them to the main body piece.
4.) Before adding the tag, I heat embossed “Joy” in gold and after adding the branch, I added red pearls for the berries. Then, with liquid adhesive, I attached the doves to the backgrounds that had now dried and I had trimmed slightly to 4 x 5 1/4.
5.) Next, I hot foiled the sentiments, one in gold and one in black, and then die cut them with the coordinating dies. I ended up die cutting the sentiment again to stack them for a little more substance before attaching to the card panels.
6.) I attached the black card directly to an A2 side-fold card base. I mounted the kraft card panel on a white panel slightly larger than 4 x 5 1/4 before attaching everything to a black A2 side-fold card base.
SUPPLIES
Honey Bee Stamps Lovely Layers: Doves – Honey Cuts
Honey Bee Stamps Foil Scripts Holiday Hot Foil Plate and Honey Cuts
Simon Says Stamp Icy Snowflakes Embossing Folder and Die
Tim Holtz Distress Frozen Fog Mica Stain
Neenah 110# Classic Crest Cardstock Solar White
Simon Says Stamp Black Cardstock 100#
Neenah Desert Storm 100# Cardstock
We R Makers Quickstik Precision Pickup and Placement Tool
Sizzix Curved Fine-Tip Tweezers
Spellbinders Platinum Die Cutting And Embossing Machine
Glimmer Hot Foil System
Bearly Art Precision Craft Glue
Tim Holtz Tonic Craft Mini Snips
Scotch 3M Post-It Masking Tape
Lawn Fawn Bone Folder
Simon Says Stamp Blending Brushes Small
Glimmer Hot Foil Black
Honey Bee Stamps Holiday Pearls
Winsor Newton Zinc White Gouache
Hero Arts Gold Embossing Powder
Versamark Clear Embossing and Watermark Ink
Simon Says Stamp Anti Static Powder Brush Tool
Cardstock from my stash