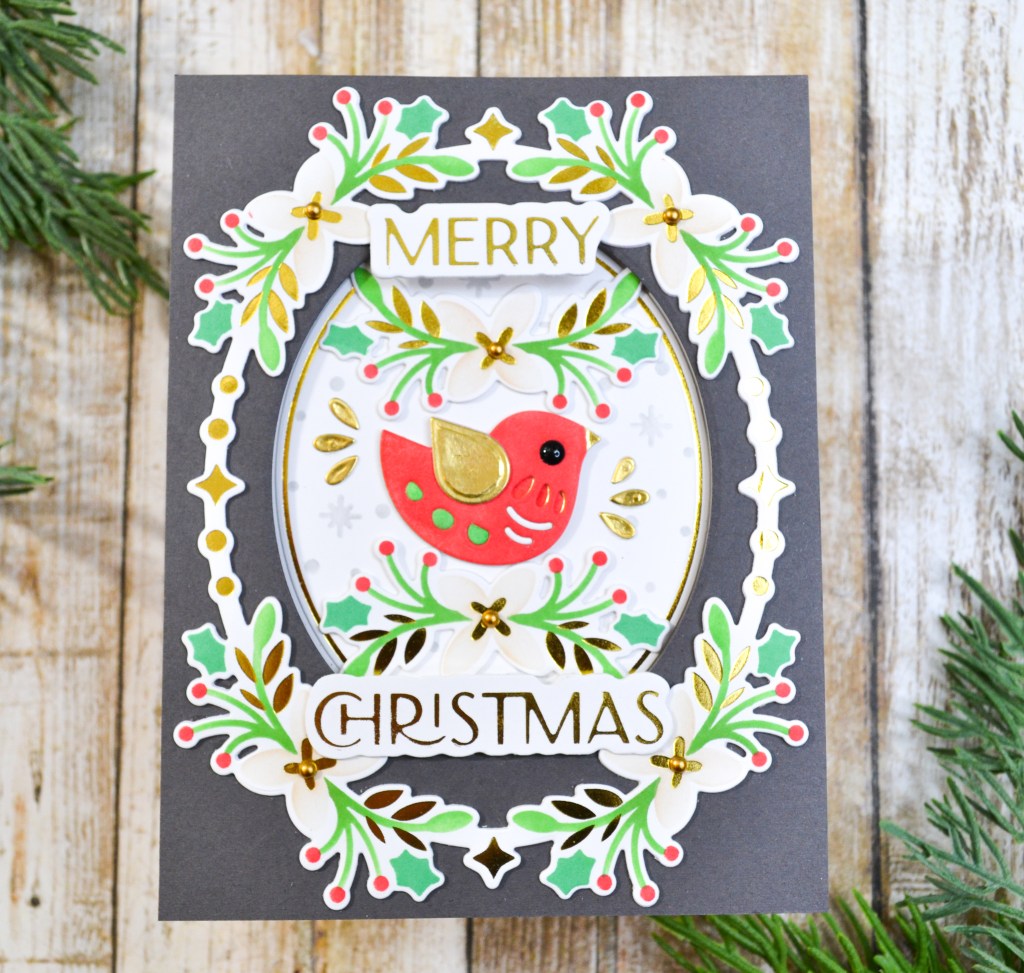
I expressed in an earlier post how much I liked the Folk Art Frame Bundle from Waffle Flower Crafts because of what seems like endless options and possibilities for card designs. Today, I’m sharing only my second card using this bundle, and you can already see the versatility. I used many of the same products such as the layered frame stencils and optional hot foiling layer. But this time, I used gold for the foiling on white cardstock, used the Folk Bird as the focal point, and traded Oxide Inks for dye inks. I love the little bird on this card and my last minute decision to use gray with the traditional red and green colors. I’ve listed all the details and supplies below. Thanks so much for stopping by my little happy place! I hope you find something that will inspire your next crafty project!

STEPS
1.) My first step was to hot foil the frame, which takes place of the third layering stencil. I did this twice in gold on white cardstock. I also hot foiled the sentiment in the same gold, also on white cardstock. Then, I finished the frames by stenciling the first two stenciling layers but skipping the floral swags in the oval center. I used two shades of green, red and just a hint of Antique Linen for the flowers. One frame I die cut using both the inner and outer frame dies getting the thin frame you see above, saving the inner oval piece with the foiled border. I die cut another thin frame in plain white cardstock so that I could stack the frames for a little more weight and substance. From the second foiled and stenciled frame, I die cut just two of the floral swags with the coordinating dies and saved the rest for another project.
2.) Next, I die cut the elements for the folk bird, mostly in white cardstock, die cutting the wing, beak and feather details in matte gold cardstock. For the die cuts in white, I used the same ink colors as I did for the frame to color them with a blending brush. I assembled the bird and inlayed certain pieces using liquid adhesive. For the eye, I used a black enamel dot from The Stamp Market. I set the bird aside while I made the background.
3.) Using the oval with the foiled border that I had saved earlier, I stenciled the snowy background from the Folk Art Bird Stencil, in a light gray. This will be the background for the bird.
4.) Next, I die cut an oval from an A2, dark gray, card panel using one of the ovals from the Folk Bird Die. Using foam tape, I attached the gray panel to an A2 side-fold card base. Then, using liquid adhesive, I inlayed the stenciled oval for the background of the bird.
5.) Using liquid adhesive, I attached the stenciled and foiled frame to the gray card panel and in the center oval, the floral swags and the bird. I cut the foiled sentiment to create two separate words before attaching with glue and foam squares where needed. The final touch was adding matte gold pearls to the flower centers.
SUPPLIES
Waffle Flower Folk Art Frame Bundle
Gold Satin Baubles Embellishment Mix
The Stamp Market Enamel Dots Collection 3
Waffle Flower Crafts Elegant Christmas Foil Plate
Waffle Flower Crafts Elegant Christmas Foil Plate Matching Die
Neenah 110# Classic Crest Cardstock Solar White
Simon Says Stamp White A2 Side Fold Scored Cards 120#
We R Makers Quickstik Precision Pickup and Placement Tool
Sizzix Curved Fine-Tip Tweezers
Spellbinders Glimmer Hot Foil System
Spellbinders Platinum Die Cutting And Embossing Machine
Bearly Art Precision Craft Glue
Scrapbook Adhesives .25″ 3D White Foam Squares
Tim Holtz Tonic Craft Mini Snips
Misti Precision Stamper Tool
Waffle Flower 6.5×8.5 Grip Mat
Simon Says Stamp Blending Brushes Small
Lawn Fawn Bone Folder
Scotch 3M Post-It Masking Tape
Simon Says Stamp Pawsitively Perfect White Foam Tape
Scrapbook Adhesives .25″ 3D White Foam Squares
Spellbinders Glimmer Hot Foil Roll Satin Gold
Simon Says Stamp Pawsitively Saturated Inks:
*Fairway
*Lucky
Distress Inks
*Antique Linen
*Lost Shadow
*Candied Apple
