
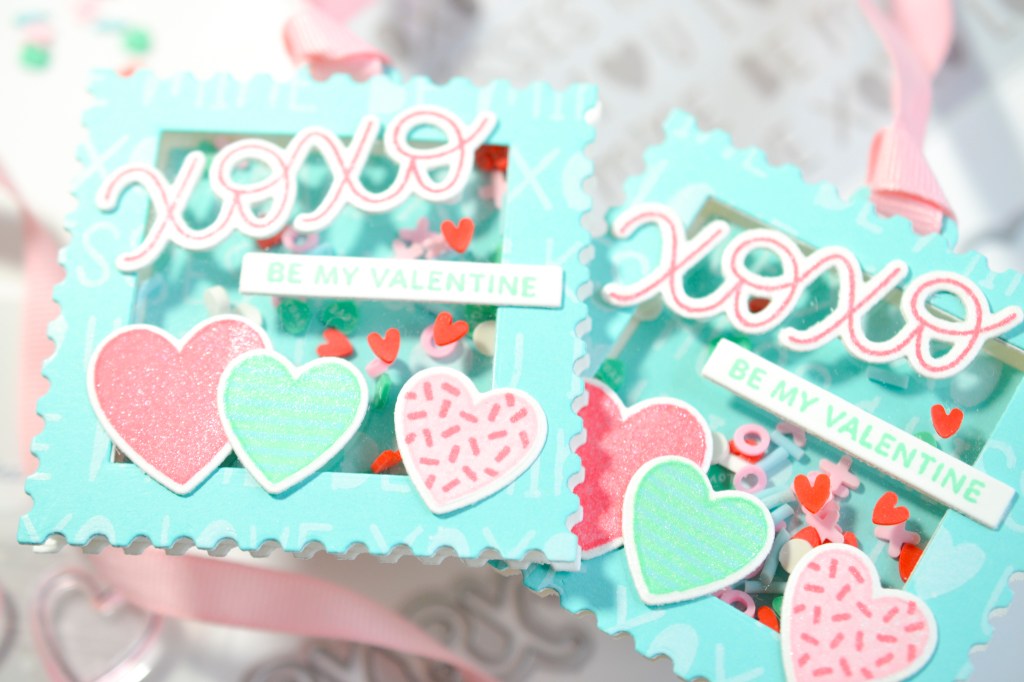
You know I couldn’t let the season of love pass by without some shaker tags! I used some of the fun, new things from Pretty Pink Posh’s January release, along with a postage frame die for these cuties. I always love a good text background so I used the new Valentine Words Stencil with white pigment ink on a pretty robin’s egg blue for my tags. Then, I stamped some of my favorite hearts from the Decorative Hearts Stamp Set in pretty colors and spritzed them with some shimmer spray for a soft, glittery look.
I mentioned before how much I like the “XOXO” from the Decorative Hearts set because, I think, it’s the perfect size. You can easily pop it into almost any Valentine themed card or tag design. Plus, look how beautifully the coordinating die cuts around that scripty text. Perfect. I paired the “XOXO” with a sentiment from the new Sentiment Strips: Valentine Stamp Set and used the XOXO Clay Confetti to fill my little shakers. A pretty pink ribbon and a place to address your Valentine finishes these fun, Valentine’s Day shaker tags!
Pretty Pink Posh Supplies:
Valentine Words Stencil
Decorative Hearts Stamp Set
Decorative Hearst Coordinating Dies
Sentiment Strips: Valentine Stamp Set
Sentiment Strips Dies
XOXO Clay Confetti

STEPS
- With the Valentine Word Stencil and white pigment ink, stencil on light blue, heavy-weight cardstock. My shaker tags are 3” x 3”, but you can make them any size. Let this dry before die cutting.
- Stamp a variety of hearts in coordinating colors. I used Distress Inks in red, pink, blue, and green. Die cut with the coordinating dies.
- Stamp the “XOXO” in red and die cut. Stamp the sentiment in green and die cut with a sentiment strip.
- Die cut the stenciled panel to use as the background and the frame of your shaker tag. I used the second smallest (3” x 4.25”) Simon Says Stamp Postage Stamp Edge Frames die. I wanted a 3” x 3” panel so I did a partial die cut and then flipped the cardstock around and finished die cutting at 3” instead of at 4.25”.
- Using the same partial die cutting as in step 4, die cut the same 3” x 3” panel from heavy-weight, white cardstock two times. One will be the back of the tag and the other will be used as part of the frame.
- With a small square nesting die, (I used a 2” x 2”square die) die cut the center of both the stenciled and one of the heavy-weight, white 3” x 3” panels, creating ½” frame pieces. With a piece of acetate cut to size, use double-sided tape to sandwich the acetate between the stenciled and the white frame pieces.
- Glue the stenciled 2” x 2” square piece, from the step above, to the center of the 3” x 3” white panel that wasn’t die cut for the frame. This is the background of the shaker tag.
- To create the walls of the shaker, attach two layers of foam strips around the backside of the frame piece, butting the ends of the strips as close together as possible. This will ensure your shaker material won’t fall out. Use an anti-static tool around the sides of the foam tape to help keep the shaker material from sticking to it.
- Fill the shaker walls with confetti and remove the release paper from the foam strips.
- Attach a tag holder die cut from light blue cardstock to the top of the background with liquid adhesive.
- Place the background panel on the foam strips, aligning it with edges of the frame.
- Attach stamped and die cut hearts and the sentiments to the front of the shaker with double-sided tape and/or thin foam squares.
- Add embellishments and/or a place to address the recipient to the back of the tag and add ribbon to the tag holder.
ADDITIONAL SUPPLIES
- Simon Says Stamp Postage Stamp Edge Frames
- Lawn Fawn Yeti Ink Pad
- My Favorite Things Tag Builder Blueprints 6 Die-namics
- Hero Arts Square Infinity Dies
- Neenah 110# Classic Crest Cardstock Solar White
- We R Makers Quickstik Precision Pickup and Placement Tool
- Simon Says Stamp Place and Pierce Embellishment Wand
- Simon Says Stamp Place and Score Embellishment Wand
- Simon Says Stamp Blending Brushes Large
- Sizzix Curved Fine-Tip Tweezers
- Spellbinders Platinum Die Cutting And Embossing Machine
- Misti Precision Stamper Tool
- Waffle Flower 6.5×8.5 Grip Mat
- Bearly Art Precision Craft Glue
- Tim Holtz Tonic Craft Mini Snips
- Scotch 3M Post-It Masking Tape
- Simon Says Stamp Anti Static Powder Brush Tool
- Waffle Flower Foam Strips ⅛”
- Scrapbook Adhesives Thin Foam Squares
- Simon Says Stamp Premium Heat Resistant Clear Acetate Sheets
- Tim Holtz Distress Ink Pad Worn Lipstick
- Tim Holtz Distress Ink Pad Spun Sugar
- Tim Holtz Distress Ink Pad Cracked Pistachio
- Tim Holtz Distress Ink Pad Tumbled Glass
- Similar to the shimmer spray I used – Tsukineko Frost Sheer Shimmer

These are amazing, Christina! Well done!!
LikeLike